Managing Items
Items are your laundry services, the things you charge for at the register. The Items page is where you add them, set prices, organize them by category, and control exactly how they appear on the POS. About 5 minutes.
Adding, editing, or deleting items requires the Manage items permission (dashboard:items:manage). Anyone signed into the dashboard can view the items table. Owners have Manage items by default; grant it to Manager-style roles in Dashboard → Roles & Permissions for staff who maintain the catalog.
Before you start
You'll need:
- A store set up so items can be assigned to it. See Stores.
- (Optional) Imported items from Loyverse. See Loyverse Import. You can edit imported items here.
If you're brand new, add 3 to 5 services first (e.g., Wash, Dry, Drop-off Small). You can always add variants, categories, and pricing tiers later. Don't try to perfect the catalog before your first paying customer.
1. Open the Items page
From the dashboard, navigate to Catalog → Items in the sidebar. The table shows every item in your catalog with its price, stock, category, and POS register settings.

Three buttons sit above the table:
- Add Item: create a new item. Covered in section 3.
- Categories: open the category manager. Covered in section 7.
- Classify Items: open a wizard that suggests Service Tags for unclassified items based on their names. Useful right after a Loyverse import.
The table itself has these columns:
| Column | What it shows |
|---|---|
| Item Name | The item name plus variant label (if any). |
| Price | Unit price in PHP. Shows a range if variants have different prices. |
| Stock | Current stock count for the selected store. Red means 0, amber means 1 to 5. |
| Availability | Whether the item is sellable at the selected branch. With a single branch selected, flip the switch to show or hide it; with All Stores selected, shows a count of branches it is available at. See Per-Branch Item Availability. |
| Category | The category this item belongs to. |
| Color | Accent color for the item's tile on the POS register. Covered in section 2. |
| Service Tag | Classifies the item for analytics. Covered in section 5. |
| Dry Count | How many dry cycles this item consumes per unit sold (in 0.25 increments). Covered in section 6. |
| Show on Card | Toggle to show this item's icon on the order board's order cards. Covered in section 2. |
| Card Icon | Pick which icon appears on the order card when Show on Card is on. |
Click the Column guide link below the table header to expand a description of each configurable column.
2. Customize how items appear
Four columns control where and how each item shows up around the app, and all of them are editable directly in the table.
On the POS register (what cashiers see while ringing up):
- Color: pick an accent color for the item's tile on the POS register. Cashiers learn the layout by color (e.g., red for drop-off, green for self-service). This also colors the dot next to the item in the items table.
On the order board (what staff see while processing orders):
- Show on Card: flip this on so the item's icon shows on every order card in the POS order board. Useful for staff to scan what an order contains at a glance, without opening it.
- Card Icon: pick which icon shows on the order card (washer, dryer, hanger, etc.). Only available when Show on Card is on.
In analytics + on the order board:
Saving bulk changes
Edit any of these columns directly in the table. As soon as you make a change, a Save Settings button appears at the bottom of the page with a count of how many items were modified. Click it to commit all changes in one batch. The button stays disabled until at least one cell changes, so you can experiment without saving.
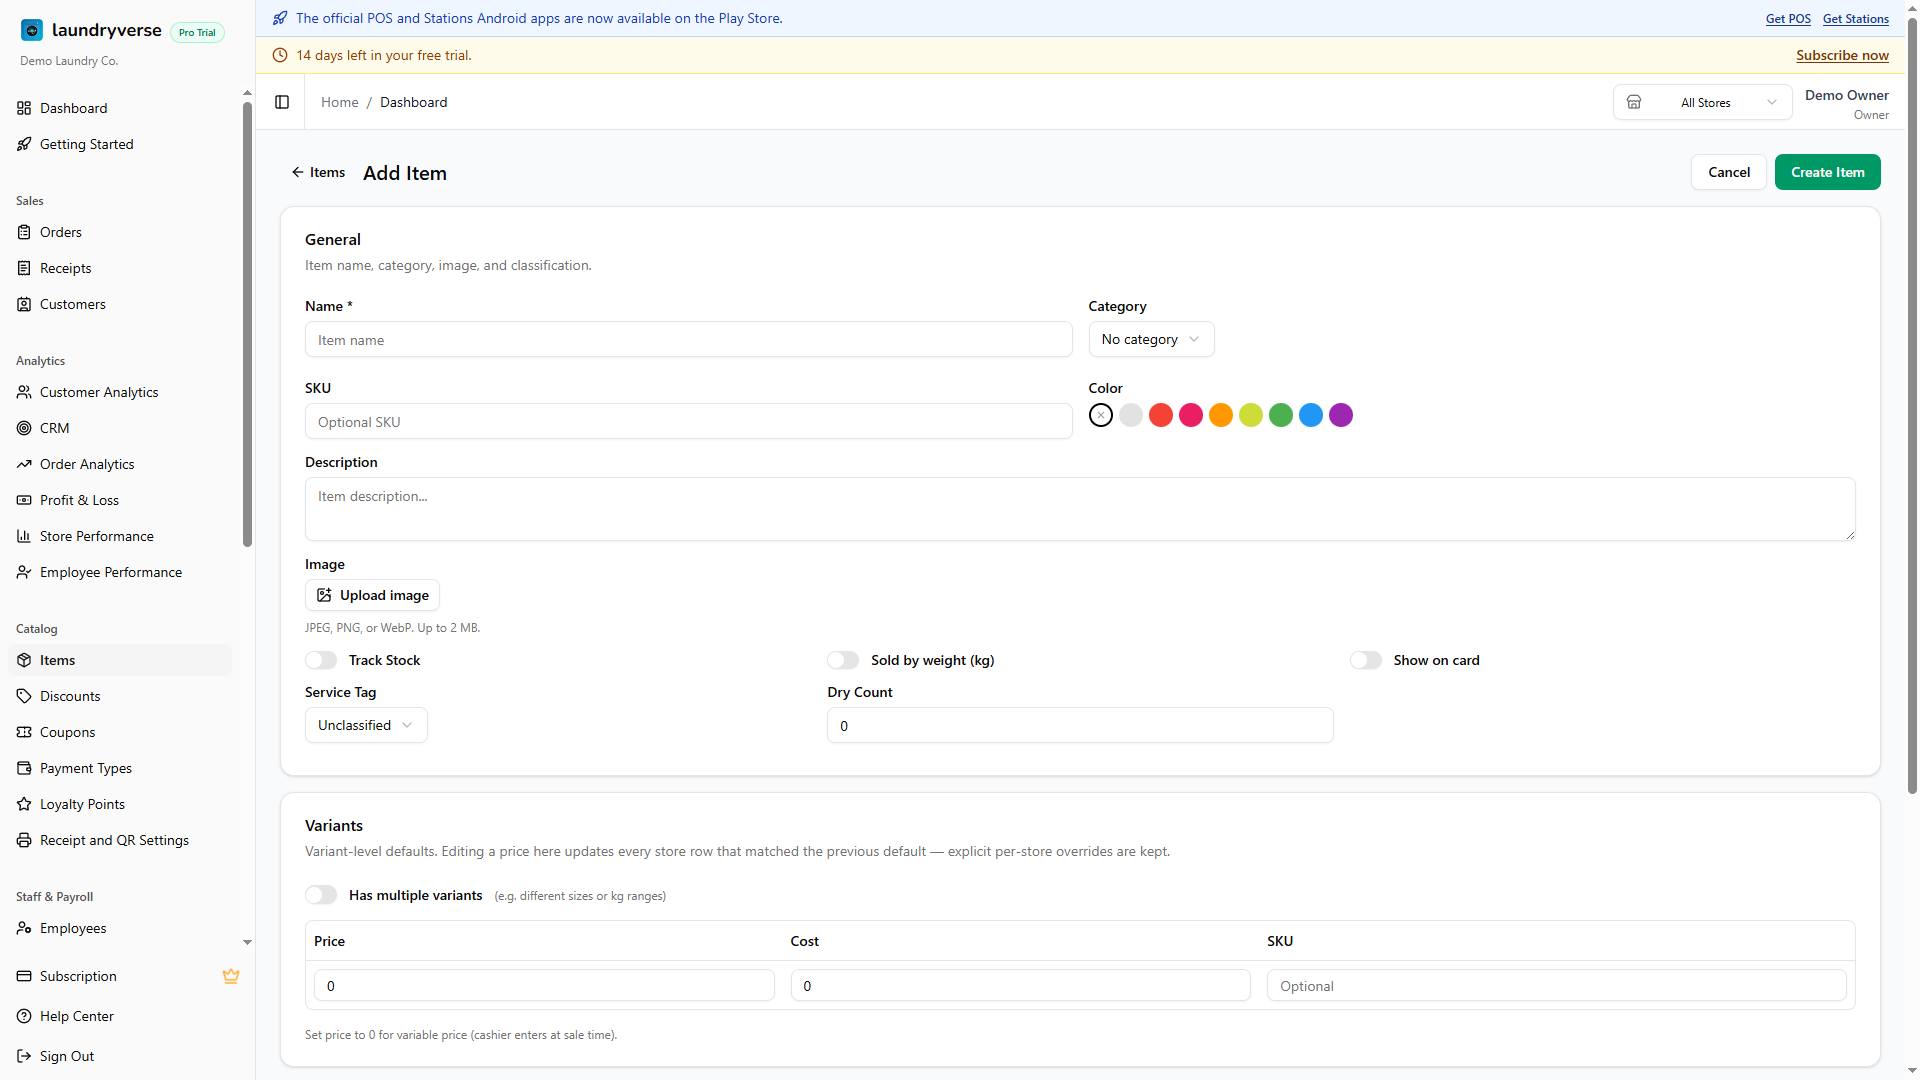
3. Add an item
Click Add Item to open the item form. Fill in:
- Name (required): the item name shown on receipts and the POS register.
- Price: unit price in PHP. Set to 0 for variable pricing (cashier types the amount at sale time).
- (Optional) Cost: your cost per unit, used for the Profit & Loss report.
- (Optional) Category: assign to an existing category or leave blank.
- (Optional) SKU: stock-keeping unit code, useful for Loyverse imports and barcode workflows.
- (Optional) Description: internal notes (not shown on receipts).
- (Optional) Track Stock: see section 8.
- (Optional) Variants: add size or type variants (e.g., Small / Medium / Large). Each variant gets its own price, cost, and stock count.
Click Create Item. New items default to available at every branch you have today. (Branches you add later start with the item hidden, see Per-Branch Item Availability.)
4. Edit or delete an item
Click the three-dot menu (⋯) on any row to:
- Edit: opens the item form pre-filled with current values.
- Delete: permanently removes the item after confirmation. Past receipts that reference the deleted item keep showing it for accounting integrity.
For bulk changes to Service Tag, Dry Count, Show on Card, or Card Icon, edit directly in the table and use Save Settings as described in section 2.
5. Service Tags
Service tags decide how each item rolls up in your analytics and whether it auto-creates an order on the POS order board:
| Tag | Counted in Service Breakdown? | Auto-creates an order? |
|---|---|---|
| Unclassified | No | No |
| Self-Service | Yes, under Self-Service | No |
| Drop-Off Indicator | Yes, under Drop-Off | Yes: when a receipt with this item rings up, an order card appears on the POS order board automatically |
The Service Breakdown chart
Open Dashboard → Reports → Service Breakdown to see the chart. Each receipt is bucketed by the tags of its items: a receipt with at least one Drop-Off Indicator item counts as drop-off, one with only Self-Service items counts as self-service, anything else stays unclassified. Set tags once per item and the chart updates retroactively across all historical receipts.
Drop-Off Indicator and the order board
The Drop-Off Indicator tag is what links a sale to the POS Order Board. Tag your bundle SKUs (e.g., "Drop-off Small", "Drop-off Big") with Drop-Off Indicator. Then every drop-off receipt automatically creates an order card on the board, and the wash → dry → fold → pack workflow kicks in. Without this tag, drop-off sales would just appear on receipts and never show up on the Order Board.
Bulk-classifying after a Loyverse import
Right after importing a long catalog from Loyverse, click Classify Items above the table to open the suggestion wizard. It scans your item names and proposes Service Tags (e.g., "Wash & Fold" → Drop-Off Indicator). Review the suggestions before saving and uncheck any rows that look off.
6. Dry Count
Dry Count tracks how many dryer cycles each item consumes per unit sold. The value is in 0.25 increments (one quarter-cycle, half-cycle, full cycle, etc.).
It feeds your LPG consumption reports: every receipt's Dry Count rollup is multiplied by your dryer's LPG-per-cycle rate to estimate gas usage. Open Dashboard → LPG to see the breakdown.
Set it on every dryer-related item (Dry, Big Dry, Add Dry) so your gas reports stay accurate. Items that don't involve a dryer (Wash, Fold) stay at 0.
7. Manage categories
Click Categories in the header to open the category manager. From here you can:
- Add a new category with a name and color. The color shows on the POS quick-select card.
- Edit an existing category's name or color.
- Delete a category. Items in the deleted category become uncategorized but otherwise unchanged.
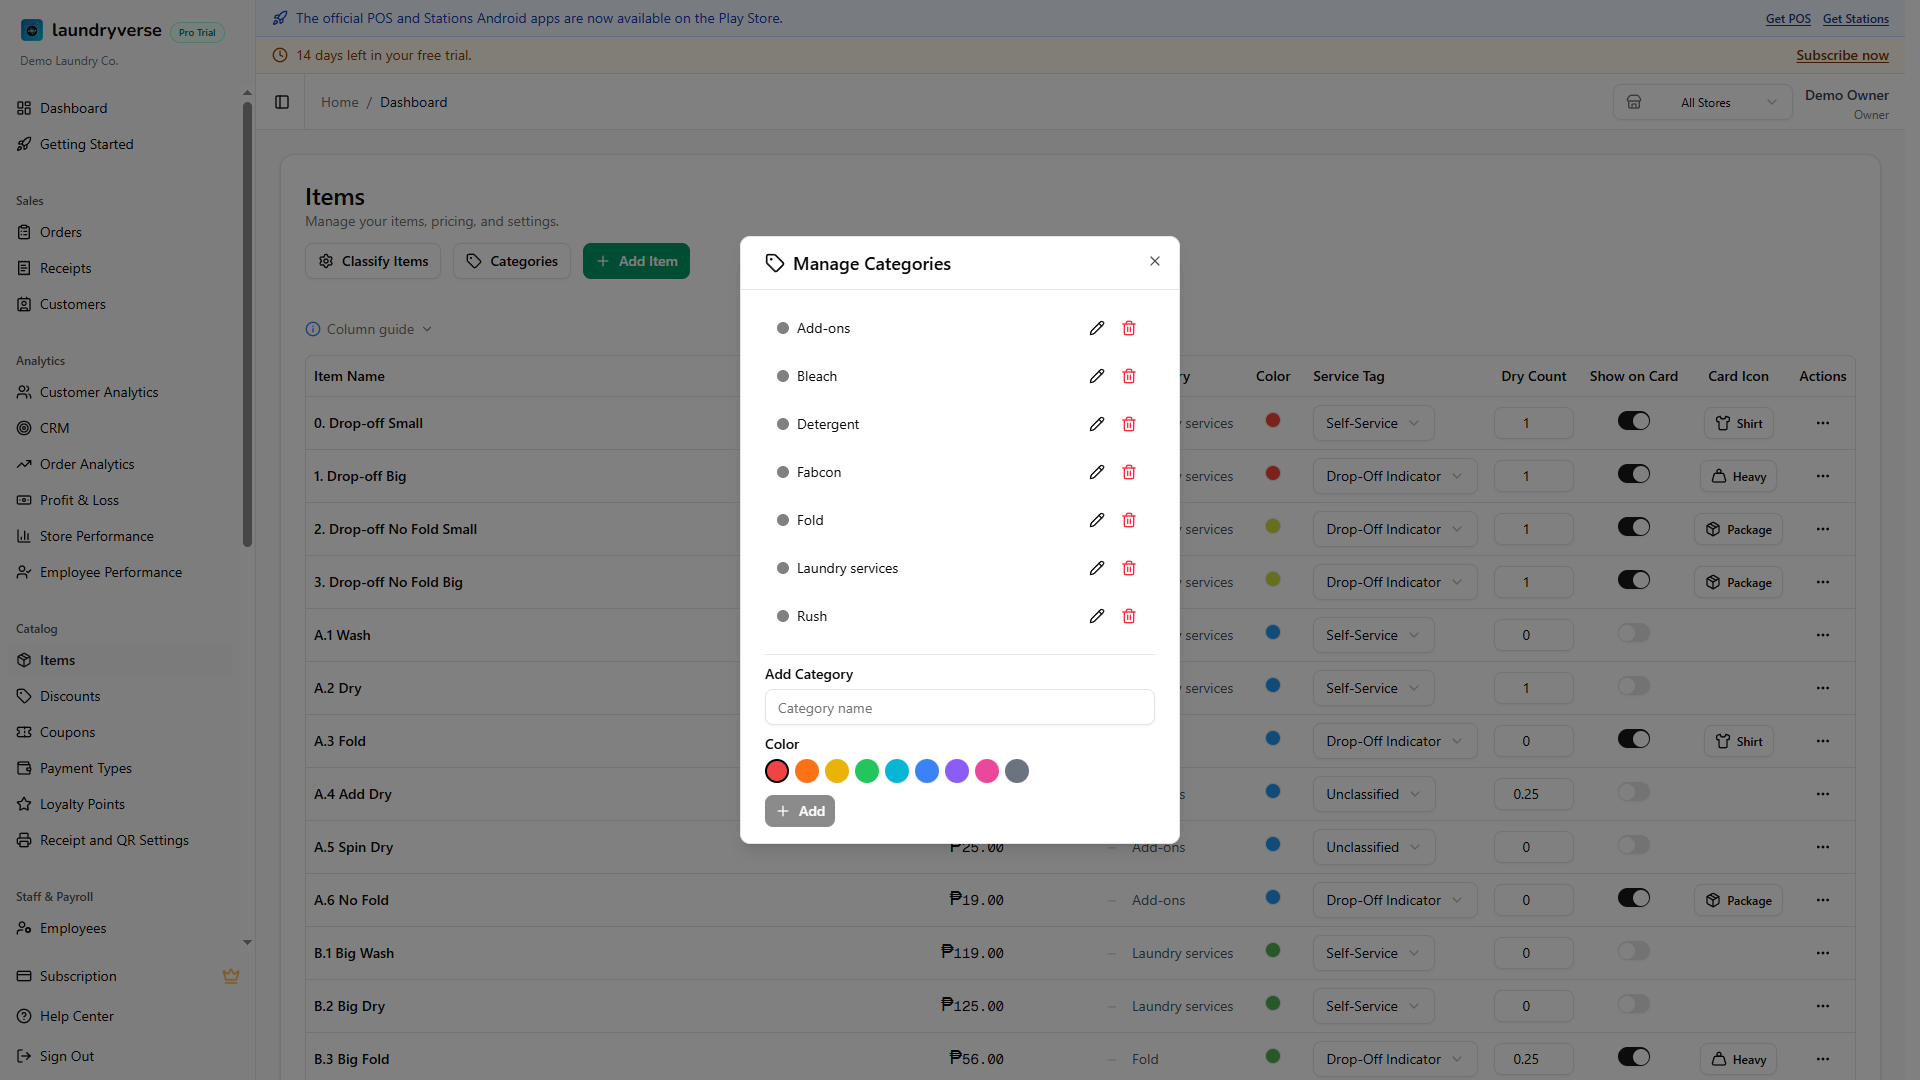
Categories show up as filter tabs at the top of the POS register. Cashiers tap a tab to narrow the visible cards.
8. Inventory and stock
LaundryVerse tracks inventory per item, per store. Stock is optional, you can run a service-only shop without it, but it's useful for retail-style items (detergent, fabric softener, plastic bags).
Enabling Track Stock
In the item form (Add Item or Edit), flip Track Stock on. Once enabled:
- Each store gets its own stock count.
- The Stock column on the items table shows the count for the currently selected store (visible in the dashboard header sub-label).
- Every POS sale decrements stock automatically.
- The cell turns amber at 1 to 5 units and red at 0, so low stock is visible at a glance.
For services like "Wash by weight" or "Drop-off Small" that don't have a finite inventory, leave Track Stock off. The Stock column shows blank for those items and the cashier can sell as many as needed.
Switching stores
Use the store selector in the dashboard header to view stock at a different location. The table updates immediately. The sub-label tells you which store you're looking at.
Manual stock adjustments
Open the item's edit form and find the stock card for the store you want to adjust. Set a new value and add an optional reason (e.g., "Inventory count 2026-05-23", "Spillage, 3 lost"). The adjustment shows up in the activity log so you can audit it later.
Loyverse imports overwrite stock
Importing items from Loyverse via the Loyverse Import flow overwrites the local stock count with Loyverse's value. If you adjust stock manually, then re-import, your manual adjustment is replaced. Import once at setup, then maintain stock here.
Common issues
"I don't see my new item on the POS register"
Most often the item is hidden at that branch. The register only shows items marked available at the branch the device is signed in to, and a newly added branch starts with every item hidden. Open Catalog > Items, switch the header branch selector to that branch, and check the Availability column (or open the item and use its Stores section). See Per-Branch Item Availability.
(Show on Card doesn't gate POS-register visibility, it controls whether the item's icon appears on the order board's order cards. See section 2.)
"Drop-off sales aren't appearing on the order board"
Your drop-off items need the Drop-Off Indicator Service Tag. Without it, receipts ring up but no order card is created. Open the items table, find your drop-off SKUs, set their Service Tag to Drop-Off Indicator, and Save Settings. Past receipts won't retroactively create orders, but new ones will.
"Stock looks wrong at this store"
The Stock column always shows the selected store's stock. Use the store selector in the dashboard header to switch. If stock looks wrong even on the right store, check whether Track Stock is enabled on the item. Items without stock tracking show a blank stock value.
"Can't delete a category"
Categories with assigned items can be deleted, but you may want to reassign items first so they don't end up uncategorized. Edit each item's Category field before deleting the category.
"Save Settings button is greyed out"
You haven't changed any bulk-editable column (Show on Card, Color, Card Icon, Service Tag, Dry Count). Edit one cell, then the button enables.
"Classify Items suggests the wrong tag"
The wizard is a starting point, not a final answer. Review the suggestions before saving and uncheck any rows that look off. You can always re-run the wizard later, or change tags one row at a time directly in the table.
What's next?
- Discounts: create percentage or fixed-amount discounts cashiers can apply at checkout.
- Coupons: time-limited promo codes for marketing campaigns.
- Payment Types: add the payment methods your shop accepts at the register.
- Reports: see the Service Breakdown and item-level sales from the items you classified above.
Stuck? Email [email protected]. The founder reads every message.