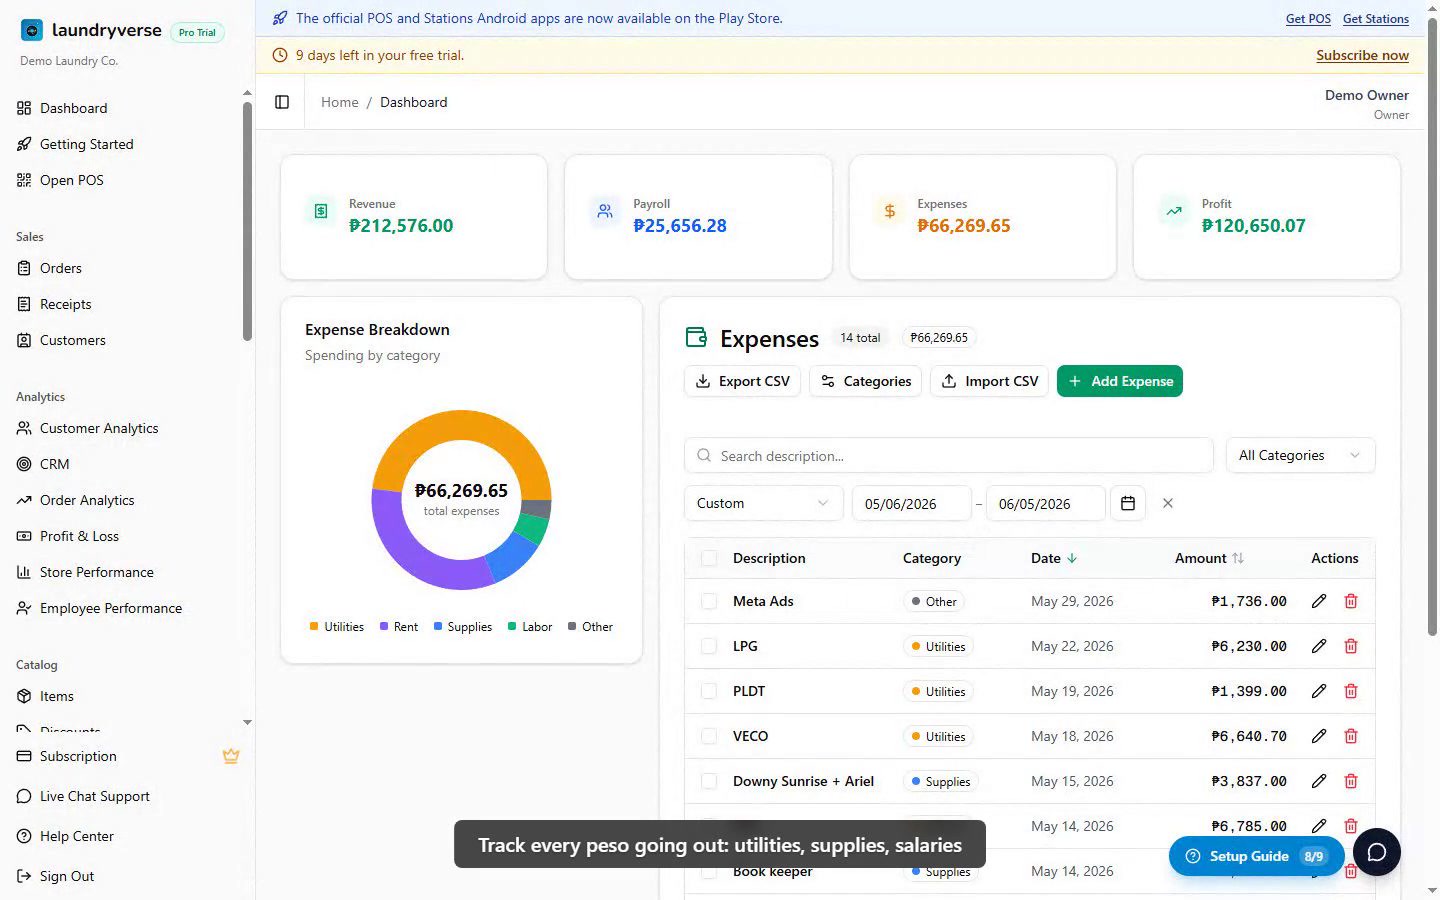
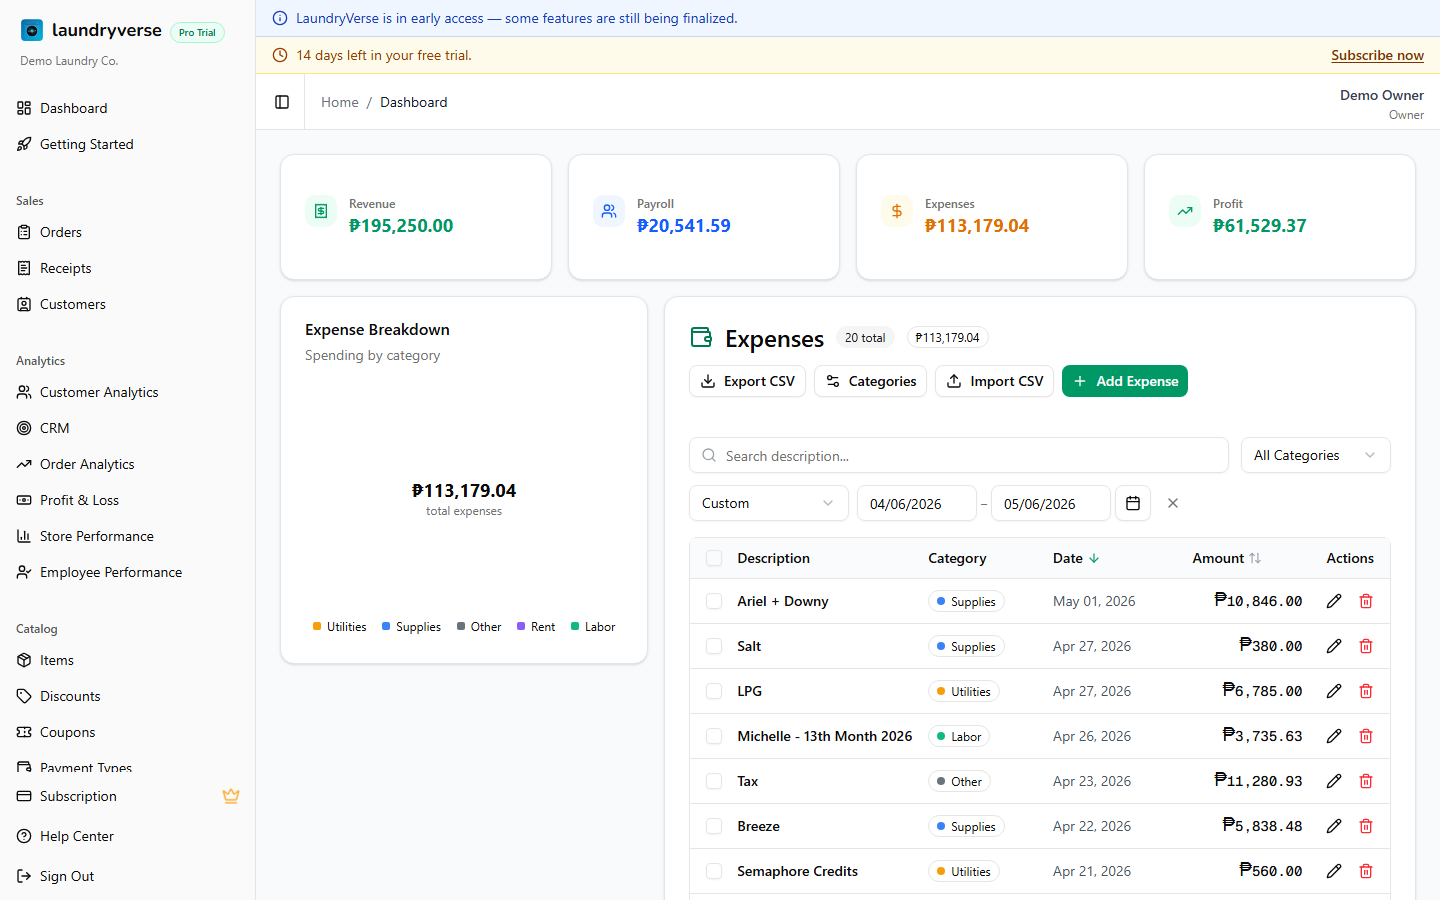
Expenses
Track every peso going out of the shop. Utilities, supplies, salaries, rent, anything. LaundryVerse subtracts your expenses from your sales so you can see real profit, not just revenue. About 3 minutes.
Adding, editing, deleting, and importing expenses requires the Manage expenses permission (expenses:manage). Owners, Admins, and Managers have it by default. Cashiers do not. Grant it to other roles in Dashboard → Roles & Permissions.
Before you start
You need at least one store set up, since every expense is logged against a branch. New tenants already have one store, so you can start logging right away. If you run multiple branches and want per-store profit, make sure each branch exists first. See Stores.
Utilities is more useful than Meralco August. The category groups the breakdown chart, while the Description field already covers the specifics. Set up your category list once and reuse it.
1. Why track expenses here
If you only see sales, you don't know what the shop actually earned. Logging expenses against the same store gets you:
- Real profit. Revenue minus payroll minus expenses for any date range.
- Where the money goes. A category breakdown chart that makes leaks obvious, for example when detergent is eating a big slice of revenue.
- Per-store profit. When you run multiple branches, see which ones make money and which don't.
The Profit summary and Category Breakdown chart at the top recompute as you change the date range or store filter.
2. Adding an expense
Click Add Expense in the top-right to open the form.
| Field | Description |
|---|---|
| Amount (₱) | The peso amount. Must be greater than zero. |
| Date | Defaults to today. Backdate it when you're entering past receipts. |
| Description | What the spend was for, for example Detergent powder 5kg, August electricity, Driver salary. |
| Category | Choose from your category list. Defaults to Supplies. |
| Store | Which branch this expense belongs to. |
| Notes | Optional. Invoice number, vendor, anything you'd want when auditing later. |
Click Add Expense and it appears at the top of the list. The profit summary and breakdown chart update immediately, no reload needed.
3. Categories
Click Categories in the top-right to manage your category list:
- Add a category with a name and color. The color is what shows up in the breakdown chart.
- Rename an existing category. Past expenses keep tracking with it.
- Remove a category with the trash icon. You can't remove the last one, every shop needs at least one category.
Save when you're done and the new list applies to the category picker and the filter right away.
4. Importing from CSV
If you keep your books in a spreadsheet, import them in bulk instead of typing each row.
- Click Import CSV in the top-right.
- Pick which store the imported expenses belong to.
- Upload a CSV file with these columns:
amount,description,date, and optionallycategoryandnotes. - Review the preview. Rows with errors are flagged before anything is saved.
- Confirm to import.
Date format must be YYYY-MM-DD. Amount must be a number with no currency symbol and greater than zero. The category name must match one of your existing categories (matching ignores upper and lower case). Rows with an unknown or missing category land as Other.
5. Profit summary
The cards across the top show, for the selected date range and store filter:
| Card | What it shows |
|---|---|
| Revenue | Total of all active sales receipts in the range, including deposits from partial payments. Cancelled receipts are excluded. |
| Payroll | Total staff pay from payroll reports that overlap the date range. |
| Expenses | Total of every expense in the same range and store filter. |
| Profit | Revenue minus Payroll minus Expenses. Turns red when the shop spent more than it earned. |
The Profit summary and Category breakdown chart are hidden on Starter. The expense list, add, edit, delete, and CSV import all work on every plan. To unlock the analytics widgets, upgrade to Business or higher. See Subscription & Billing.
6. Editing and deleting
- Edit. Click the pencil icon on a row, change any field, then save.
- Delete one. Click the trash icon and confirm. A deleted expense can't be undone, the row is gone.
- Delete several. Tick the checkbox on multiple rows, then click Delete (N) and confirm.
7. Exporting
Click Export CSV to download the current filtered view. It honors your search, category, date range, and store filter, so export exactly what's on screen. Exporting needs the same plan as Receipts, Business and above.
Common issues
"The profit summary and chart aren't showing"
Those two widgets are part of the analytics on Business and higher. On Starter they're hidden, but the expense list, adding, editing, deleting, and CSV import all still work. Upgrade in Subscription & Billing to turn them on.
"My CSV import skipped some rows"
The preview flags rows it couldn't read. The usual causes are a date that isn't in YYYY-MM-DD format, an amount that's blank, zero, or has a peso sign in it, or a missing description. Fix those rows in your spreadsheet and import again. Rows with a category name that doesn't match your list aren't skipped, they just land as Other.
"I can't remove a category"
Every shop needs at least one expense category, so the trash icon is disabled when only one is left. Add another category first, then you can remove the one you don't want.
"Search isn't finding my expense"
The search box only matches the Description text, not notes, amounts, or categories. It also waits about half a second after you stop typing before it filters. To narrow by category or by branch, use the category dropdown and the store filter instead.
"I don't see a Store column"
The Store column only appears when your shop has more than one branch. If you run a single store, every expense belongs to it automatically and the column is hidden to keep the table clean.
"Add Expense is missing or does nothing"
Only roles with the Manage expenses permission can add or change expenses. If you're signed in as a Cashier or a custom role without it, ask an Owner or Admin to grant the permission in Dashboard → Roles & Permissions.
What's next?
- Receipts: the income side of your profit, every sale your shop made.
- Stores: set up a branch before logging expenses against it.
- Shift Reports: the cash-drawer view of each shift, including pay-outs at the counter.
- Subscription & Billing: upgrade to Business to unlock the profit and breakdown widgets.
Stuck? Email [email protected]. The founder reads every message.