Devices
Devices is where you see every tablet and phone signed in to your shop, control which ones are allowed to log in, and configure printer behavior per POS tablet. POS devices live at the counter; Station devices live at wash, dry, and pack. Both auto-register the first time an employee enters their PIN on the device. About 4 minutes.
Managing devices requires the Manage devices permission (devices:manage). The default Owner and Admin roles both hold it. Manager and Cashier do not, so day-to-day staff can use a device they're signed in on without being able to delete it, rotate the store code, or change another tablet's printer settings. To let a trusted lead handle device administration, grant Manage devices to their role from Roles & Permissions and invite them to the dashboard from the Employees page. Without this permission, every Toggle, Delete, Rename, and Generate Code action returns an error from the server.
Before you start
You'll need:
- At least one store so devices have somewhere to bind. See Stores.
- At least one employee with a PIN, since a device only registers itself the first time someone signs in on it. See Employees.
You do not need to pre-register tablets here. The page is read-only for the device list itself; rows appear automatically once a staff member signs in. What you do manage from this page is the store code and login QR each tablet uses to bind.
1. Open the Devices page
From the dashboard, navigate to Operations -> Devices in the sidebar.
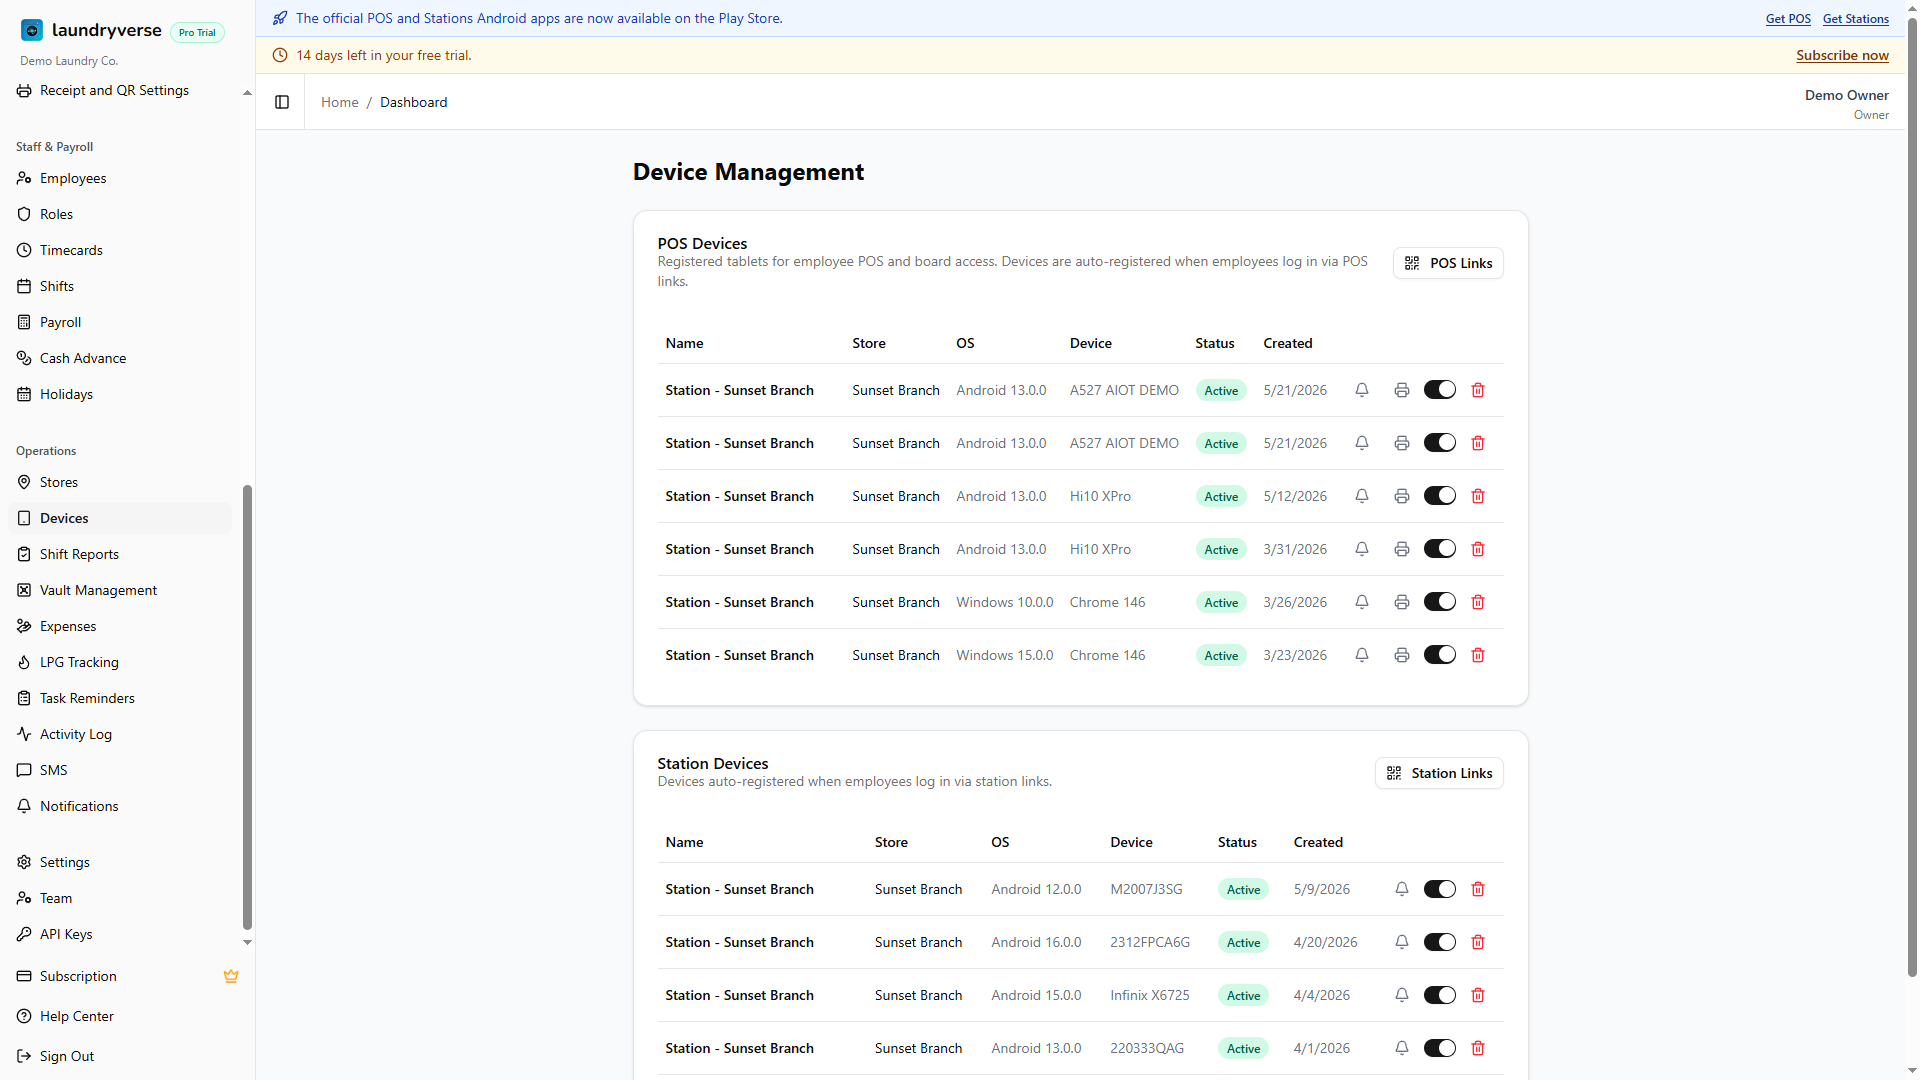
The page splits into two cards:
- POS Devices: counter tablets used by cashiers for the order board, register, checkout, shifts, and receipts.
- Station Devices: phones or tablets at wash, dry, and pack used by station staff to scan loads through QR codes and clock in.
A banner at the top of the page shows your current active device count against your plan's limit, for example Devices: 3 / 5. Trial tenants get unlimited devices for the full 14 days; paid tiers cap at their own number (Starter 5, Business 25, Pro and above unlimited).
2. Read the device table
Each card has its own table. The columns are the same for POS and Stations.
| Column | What it shows |
|---|---|
| Name | Editable label. Tap the name to rename in place. Hit Enter to save, Escape to cancel. |
| Store | Which store the device is bound to. Set automatically by which login QR was scanned. |
| OS | Operating system reported by the browser (e.g. Android 14, iOS 17). |
| Device | Phone or tablet model the browser reports (e.g. Pixel Tablet, iPad). |
| Status | Active (green) means the device can log in; Inactive (grey) means it can't. |
| Created | First time this device registered, useful for spotting unknown tablets. |
| Actions | A bell for push notification settings, a printer icon on POS rows only, an Active toggle, and a trash icon. |
The dashboard's global store selector (in the header) also filters this list. With All stores selected, every device on the account shows up. Pick a single store and the tables narrow to just that branch's devices.
3. Share the POS login QR
POS tablets bind to a store by scanning that store's QR code. Tap POS Links in the POS Devices card header to open the share dialog.
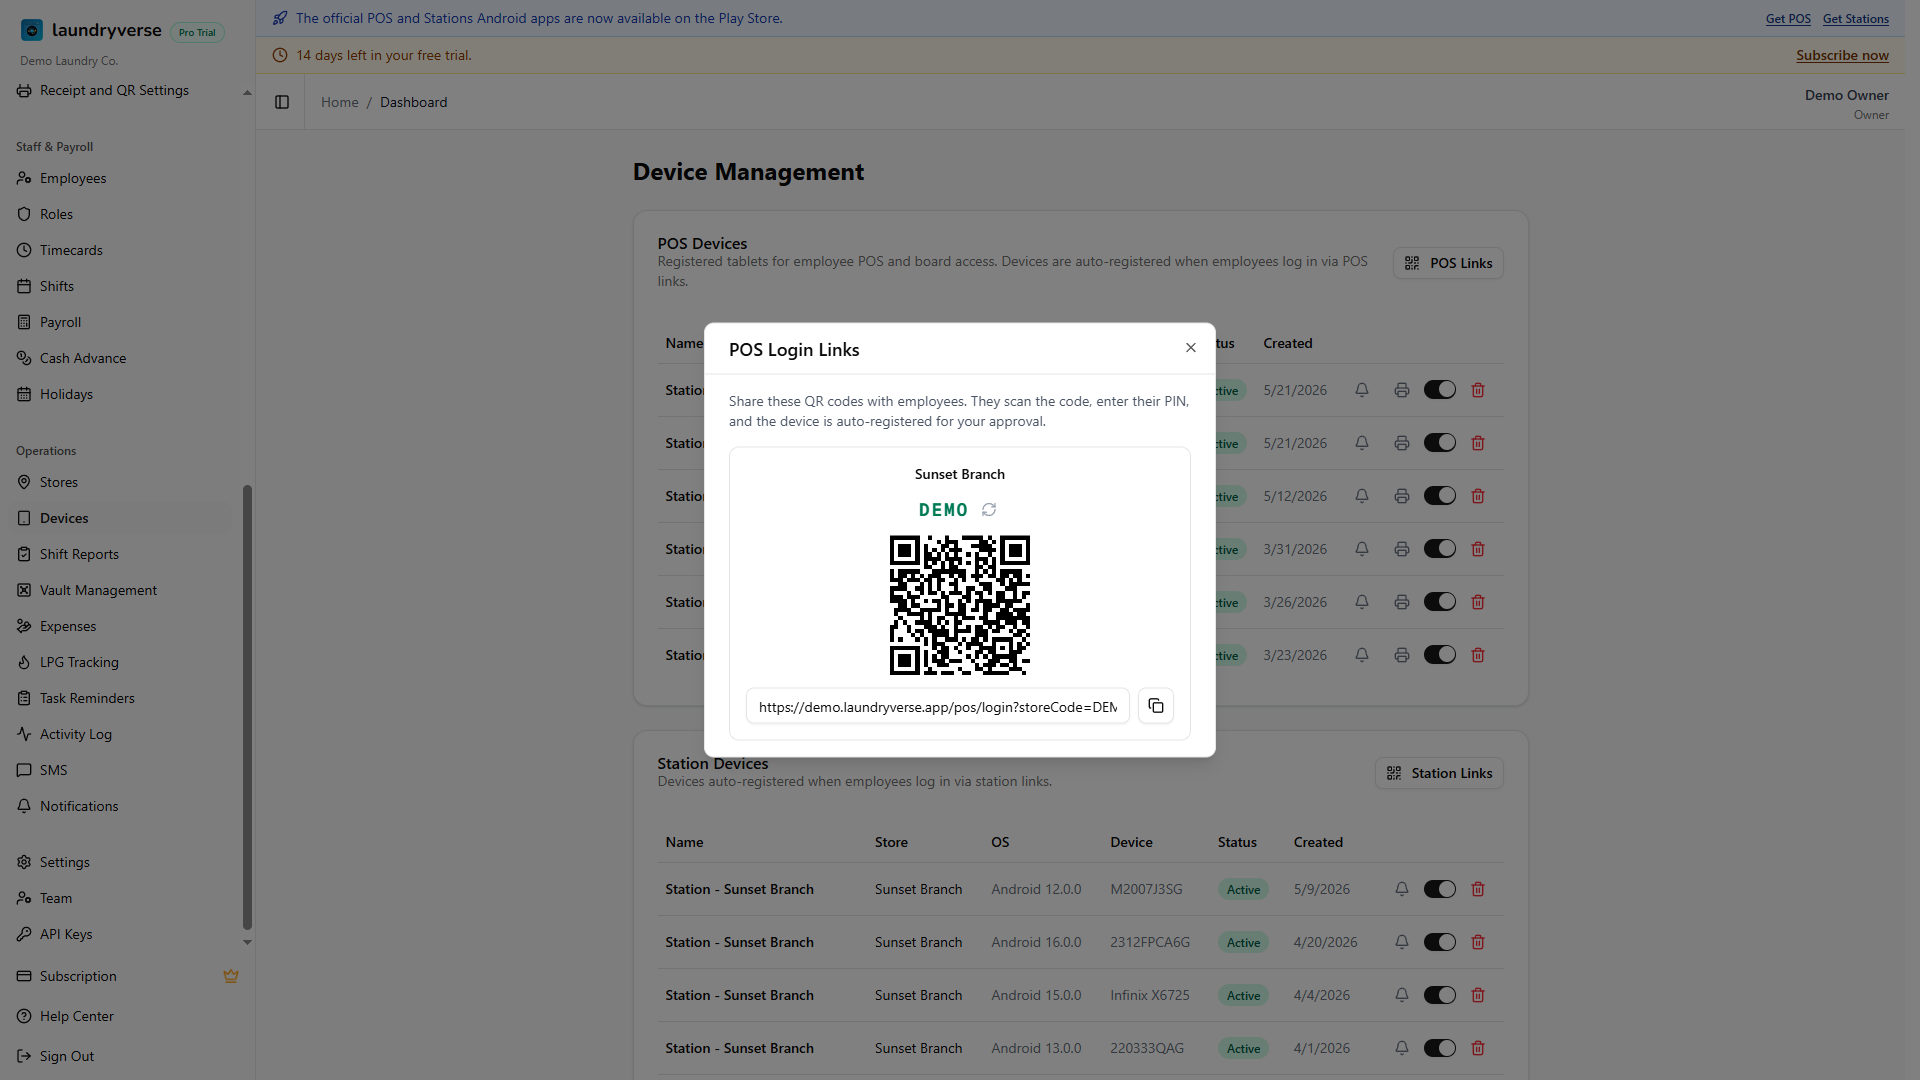
For each active store you'll see:
- 6-character store code in monospace (for example
DEMOXY). This is the part the cashier types if they can't scan. - QR code that points to
/pos/login?storeCode=<code>on your domain. Scan it from a tablet's camera to land straight on the PIN entry screen. - Login URL in a read-only input with a Copy button. Use this when you want to send the link in chat or pre-load it on a kiosk browser.
- Refresh icon next to the code. Tapping it rotates the store code immediately. Use this after a tablet is lost or stolen, since the old code stops working straight away.
If a store has no code yet, the dialog shows a Generate Code button. Tap it to mint the first one.
Print the QR code from this dialog and tape it next to the counter. Cashiers point the camera at it on shift start and land on the PIN entry screen without typing anything. The QR encodes the store code, not a one-time token, so the same printed sheet works forever, until you deliberately rotate the code from the refresh icon.
4. Share the Station login QR
Station devices use a separate set of QR codes that point to /stations/login instead of /pos/login. Tap Station Links in the Station Devices card header to open the matching dialog.
The layout is identical to POS Links: per-store code, QR, copyable URL, refresh icon. The codes themselves are the same string the POS shares, but the URL the QR encodes is different, so you can print one POS sheet and one Station sheet per store without mixing them up.
5. How devices register
You don't add devices manually from this page. A new row appears the first time an employee:
- Scans the POS or Station QR for a store (or types the store code at
/pos/loginor/stations/login). - Enters their PIN successfully.
At that moment the browser is bound to that store, the row appears in the matching card marked Active, with the OS and device model filled in from what the browser reports. The device label defaults to a generic name like POS Device 1, which you can rename inline by tapping the name.
There is no manual approval step. If you see a row you don't recognize, toggle it inactive or delete it (see sections 6 and 7).
6. Rename a device
Tap the device name in the table to edit in place. Type the new label, hit Enter to save or Escape to cancel. Names are 1 to 100 characters and only show in your dashboard. Good labels match the physical units, for example Counter 1, Wash Tablet, Fold Station. The cashier signed in on that device sees the original generic name on their side, so renaming is purely for the admin view.
7. Deactivate vs delete
You have two ways to take a device out of circulation. Pick based on whether you ever want it back.
| Action | What happens |
|---|---|
| Toggle Active off (the switch in the row) | The device stops counting against your plan's device limit and can no longer hold a live POS or Station session. Its push subscription pauses. History stays intact. Flip it back on later to restore. |
| Delete (trash icon) | Permanently removes the device record and detaches it from any push subscriptions. The store the device was bound to has its store code rotated automatically, since deletion usually means the tablet was lost or compromised. Print and redistribute the new QR code from POS Links right after. Cannot be undone. |
If the device has an open POS shift, the delete button refuses with "This device has an open POS shift". Close that shift from Shift Reports first (force-close if the original cashier can't), then come back and delete.
There is no soft-delete or "move to another store" action. To move a tablet to a different store, delete it here, then have the employee sign in again on the new store's QR. The device auto-registers under the new store as a fresh row.
8. Printer settings (POS only)
POS rows have a printer icon in the actions column. Station rows don't, since wash and pack devices don't print receipts. Tap the printer icon on any POS device to open per-device printer settings.
| Setting | What it controls |
|---|---|
| Paper Width | 80mm (standard) or 58mm (compact). Must match the physical printer. |
| Auto-print receipt | Print the receipt automatically after every charge completes. |
| Open drawer on charge | Kick the cash drawer after every cash payment. |
| Open drawer on cash events | Open the drawer before shift open and close, and before pay-in and pay-out. |
Settings save per device, so the counter tablet and the lobby kiosk can each have their own configuration. Tap Save to apply. For pairing the actual hardware (USB or Bluetooth), see Printer Setup.
9. Push notifications
Every row (POS and Station) has a bell icon in the actions column. Tapping it opens push notification preferences for that device. Toggle which events deliver browser notifications:
- New order created
- Payment proof submitted
- Vault and cash control alerts
- Maintenance reminders
- General announcements
Notifications fire even when the app is in the background, as long as the device has notification permission granted and an internet connection. If a device hasn't enabled push from its own browser yet, the dialog shows No active push subscription and you'll need the cashier to enable it from the POS settings on that tablet first.
10. Subscription limits
Active device count is capped per tier:
| Plan | Active devices |
|---|---|
| Trial | Unlimited (full 14 days) |
| Starter | 5 |
| Business | 25 |
| Pro | Unlimited |
| Enterprise | Custom (contact us) |
Limits apply to Active devices only. Toggling a tablet inactive frees a slot immediately, no need to delete the record. When you hit the cap, the banner at the top turns amber and links to Upgrade for more (or Contact us on Enterprise).
If you spin up more devices during the trial than a lower paid plan supports, that plan's Subscribe button stays disabled until you deactivate devices down to its cap. The current count vs limit is always visible from the banner.
Common issues
"Cashier scanned the QR but the PIN screen says wrong store code"
The store code was rotated since the QR was printed. Open POS Links in this page, check the current code for that store, and either re-print the QR or have the cashier type the new 6-character code at /pos/login.
"Device shows offline / nothing happens after I tap a row"
The Devices table doesn't show live online status. Active just means the row is allowed to log in. To check whether a tablet is actually online right now, open the POS on that tablet and watch for the network indicator. The row's Created column only tells you when it first registered.
"Wrong store on a device that I want to move"
Each row is store-scoped and there's no in-place transfer. Delete the device here (the store code rotates automatically for safety), print the new QR for the destination store, and have the employee scan it on that tablet. A fresh row appears under the new store.
"Can't delete a device — open shift error"
The device has a POS shift that's still open. Closing /pos/shift/close needs the device's session, so deleting a device with an open shift would orphan the shift with no UI to ever close it. Go to Shift Reports, force-close the shift, then return and delete the device.
"POS Links / Station Links button does nothing"
Your role is missing Manage devices. The dialog opens for everyone, but the Generate Code and Refresh actions inside it both require Manage devices, and so do every other write on this page. Either sign in as Owner or Admin, or have the owner grant Manage devices to your role from Roles & Permissions.
"I rotated the store code but the QR I'm looking at still works"
Tablets that are already signed in stay signed in; rotation only stops new logins with the old code. If you rotated because a tablet was lost, also delete the lost device from the table to revoke its existing session.
What's next?
- Stores: add the branches each device binds to.
- Employees: create the PINs that auto-register devices on first login.
- Printer Setup: pair the physical thermal printer to a POS tablet.
- Setting Up the POS: end-to-end walkthrough of activating your first counter tablet.
Stuck? Email [email protected]. The founder reads every message.