Order Detail
The Order Detail page is where your team manages a single order. Advance each load through wash, dry, and pack, see the payment breakdown, reprint receipts and QR labels, edit notes, flag short change, and mark the order claimed when the customer collects it. You open it by tapping any order card on the Order Board. About 3 to 4 minutes.
Opening an order's detail page needs the View orders permission (orders:view). Advancing loads, claiming an order, editing notes, and flagging short change all sit behind Edit orders (orders:edit). Both are held by the default Owner, Admin, Manager, and Cashier roles, because the cashier at the counter is the person doing this work.
Two actions on this page are more sensitive and are held by Owner, Admin, and Manager but not Cashier:
- Override load status (
orders:override_status) is the dropdown that jumps a load straight to any stage, skipping or reverting steps. A cashier advances loads one step at a time with the action button, but cannot override. - Void short change (
orders:void_short_change) cancels a flagged short change entry, used to correct a typo-ed amount. A cashier can flag short change and mark it given, but cannot void the entry.
Reprinting a receipt needs View receipts (receipts:view), and the Charge button uses the register, covered in Processing Payments. To change any of this, edit the role in Roles & Permissions.
Before you start
The Order Detail page reads one order and records load and payment changes against the active shift. You'll need:
- A device activated and an employee logged in. See POS Setup.
- An active shift open for the current employee. See Shifts.
- At least one order on the board. See Register or Creating Your First Order.
Reprinting receipts, bills, and QR labels needs a paired thermal printer. See Printer Setup.
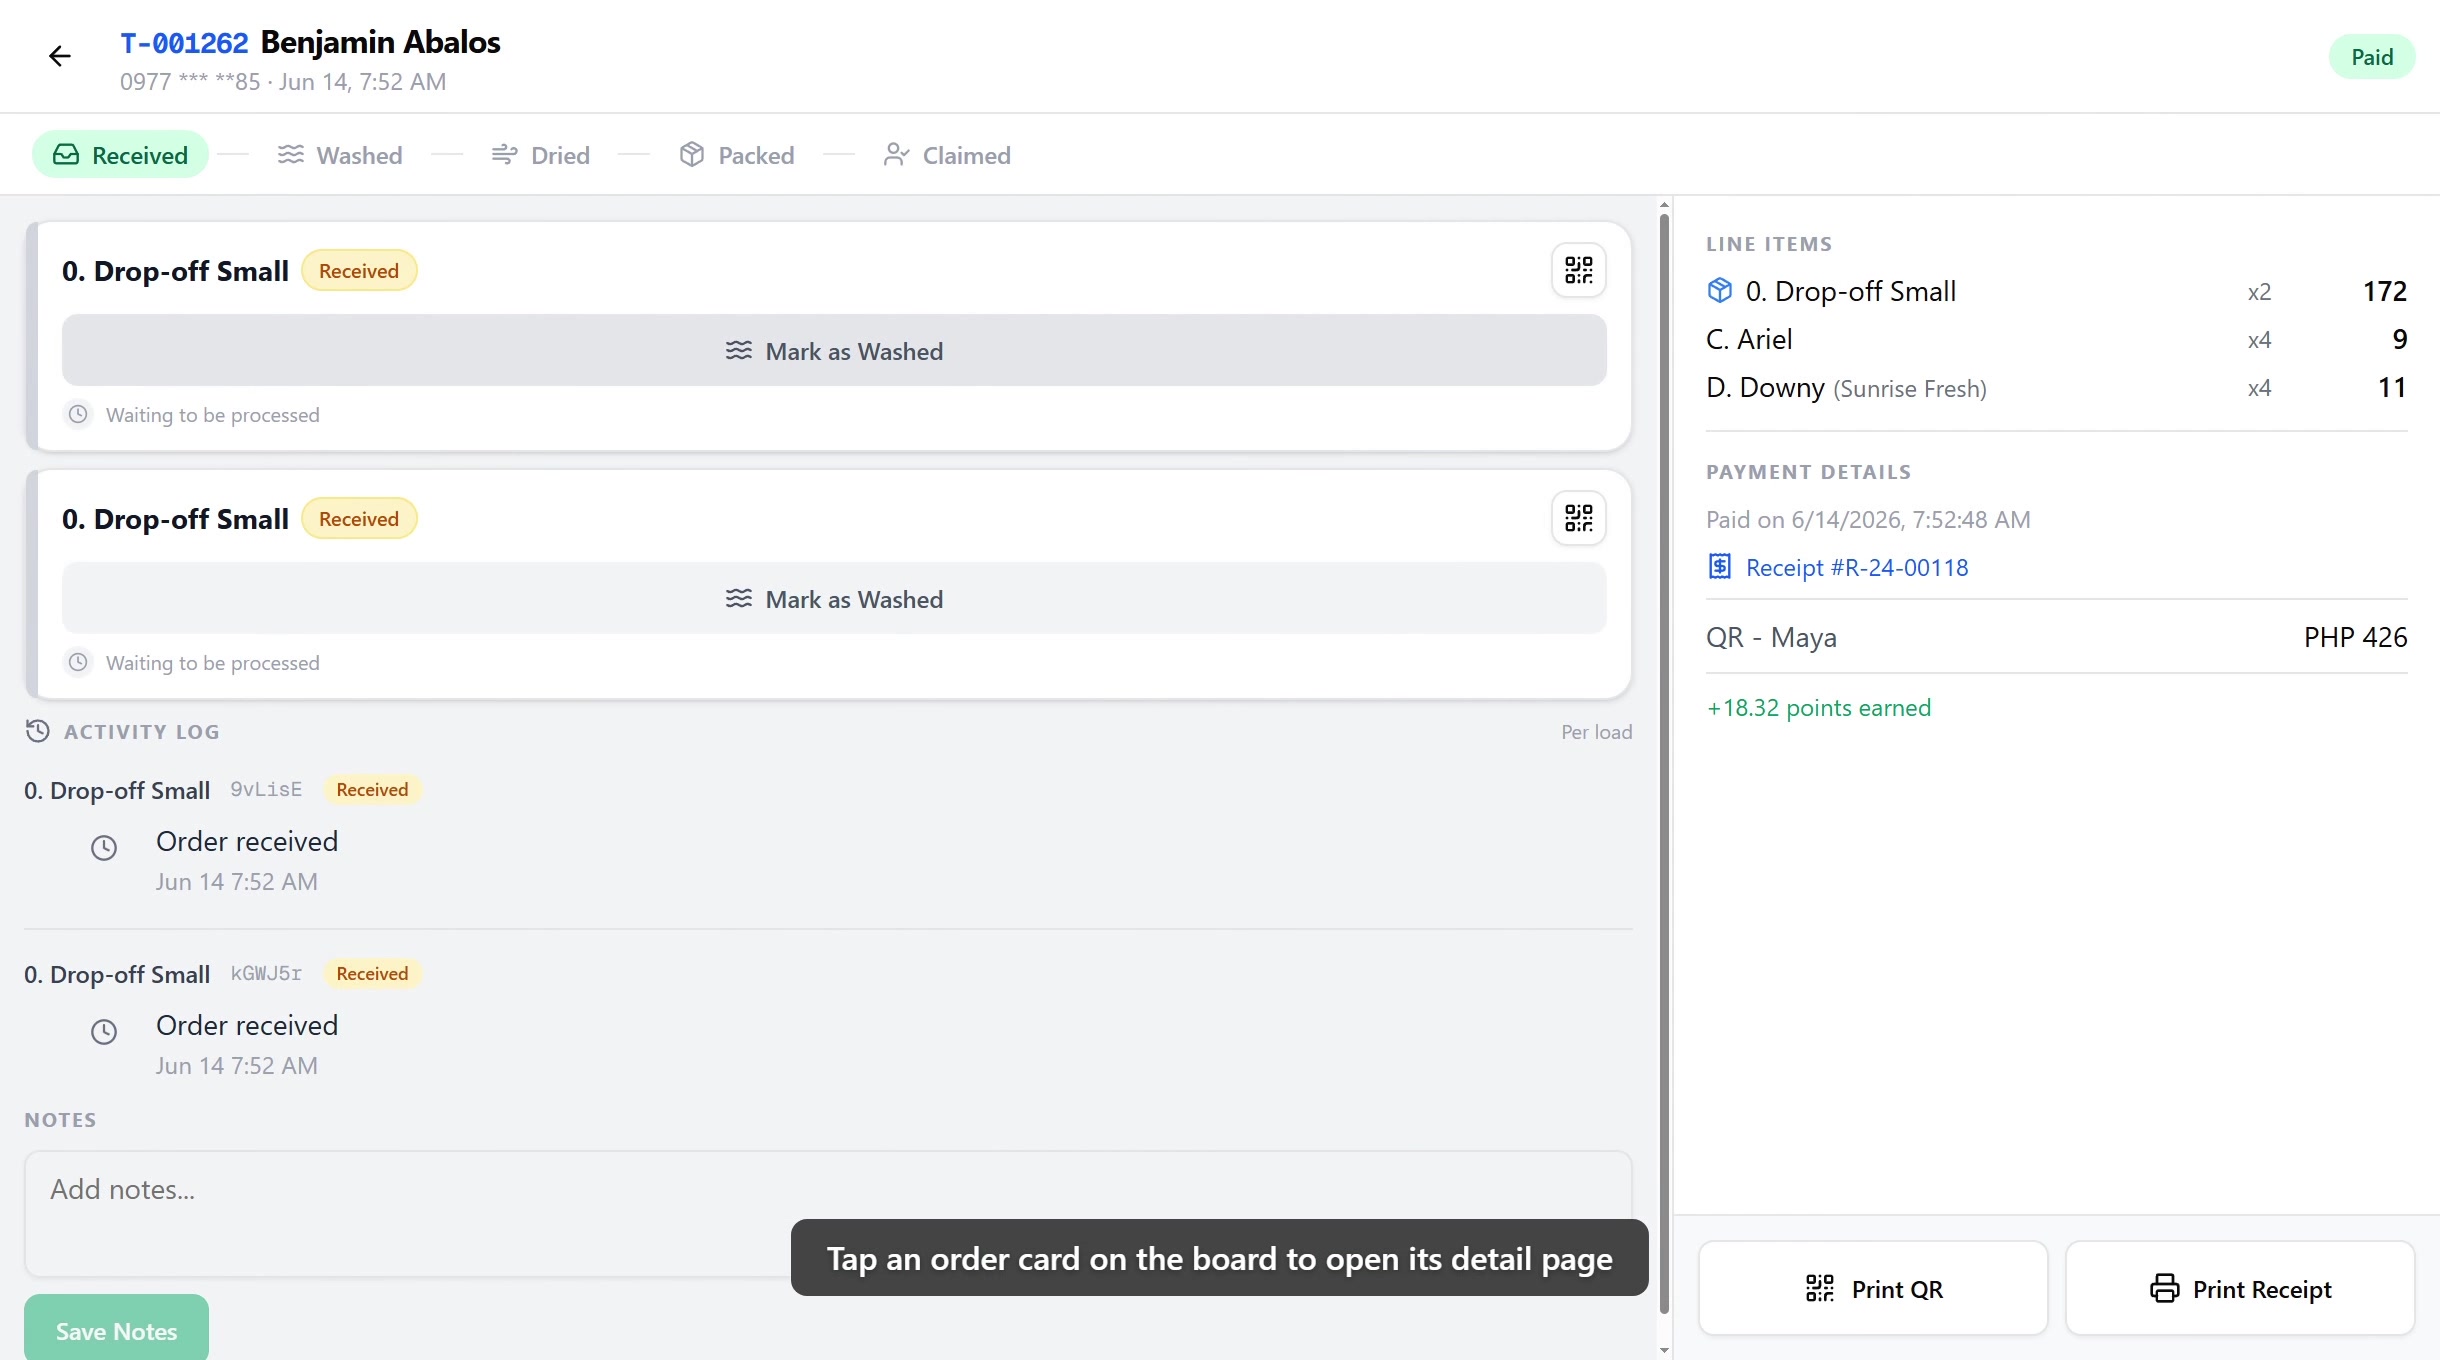
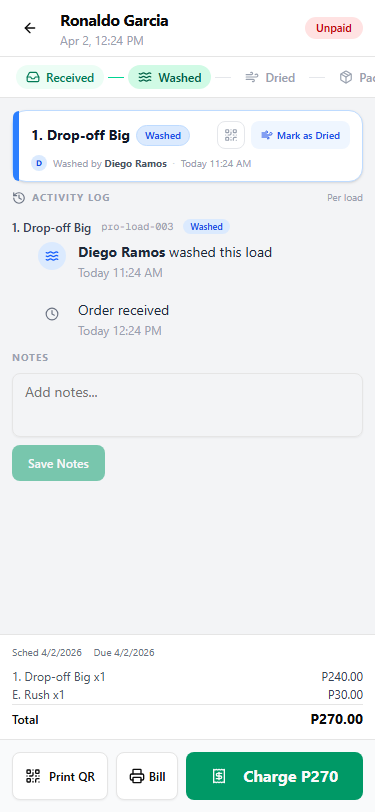
1. Page layout
The page uses a two-panel layout.
| Area | Where | What it shows |
|---|---|---|
| Top bar | Full width | Back arrow, ticket number, customer name and phone, creation date, printer status, payment badge |
| Progress stepper | Below the top bar | Overall order progress, Received to Washed to Dried to Packed to Claimed |
| Left column | Main area | Load cards, the activity log, notes, and the claimed banner |
| Right column | Sidebar | Dates, line items, payment details, short change, and the print, charge, and claim actions |
On phones the right column collapses into a sticky bottom bar. See Mobile view.

2. The order header
The top bar shows the order at a glance:
- Back arrow returns to the Order Board.
- Ticket number is the blue reference, like
T-0001. - Customer name and phone number.
- Creation date, when the order was placed.
- Printer icon shows whether a thermal printer is connected.
- Payment badge, color coded by status.
| Badge | Color | Meaning |
|---|---|---|
| Paid | Green | Fully paid |
| Partial | Amber | Some payment received, balance remaining |
| Unpaid | Red | No payment yet |
3. Dates and line items
The right panel lists:
- Scheduled, the pickup date set when the order was created.
- Due, the date the order is meant to be finished.
- Line items, each with name, quantity, unit price, and subtotal. Drop-off items show a package icon next to the name.
- Total, the grand total for the order.
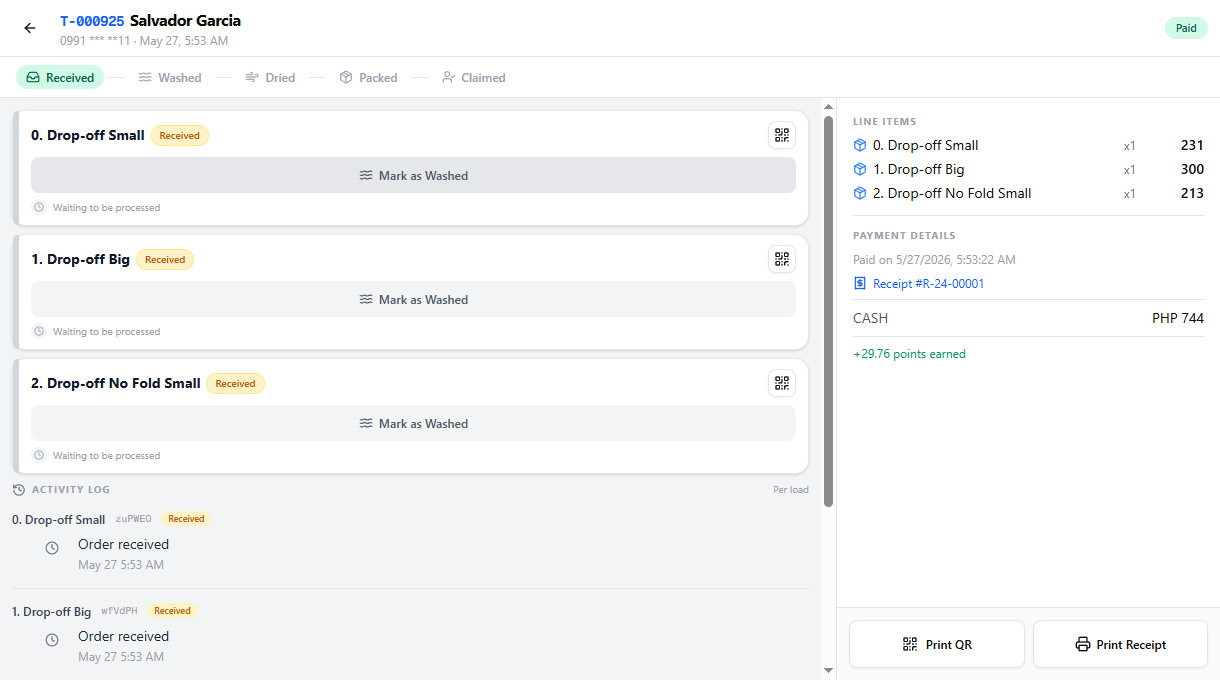
4. Managing loads
Each load on the order is a card in the left column. A load card shows the load type, the current status badge, and the action button for the next step.
Advancing a load
Tap the action button on a load card to move it to the next stage. The button always names the next step.
| Current status | Badge color | Next action |
|---|---|---|
| Received | Amber | Mark as Washed |
| Washed | Blue | Mark as Dried |
| Dried | Amber | Mark as Packed |
| Packed | Green | Done, no further action |
Every advancement records who did the step and when, which is what fills the activity log below.
Override load status
Staff with the Override load status permission see a dropdown on each load card that jumps a load straight to any stage. This is for corrections, like marking a load packed after it was processed offline. A cashier does not see this dropdown and advances loads one step at a time. See the Who can do this note above.
QR code preview
Tap the QR icon on any load card to preview a scannable QR code. The code links to the station tracking page for that load and shows the customer name, receipt number, and load number.
Print QR labels and stick them on the laundry bags so staff at each station can scan and advance loads without opening the app. Use Print QR Labels in the actions area.
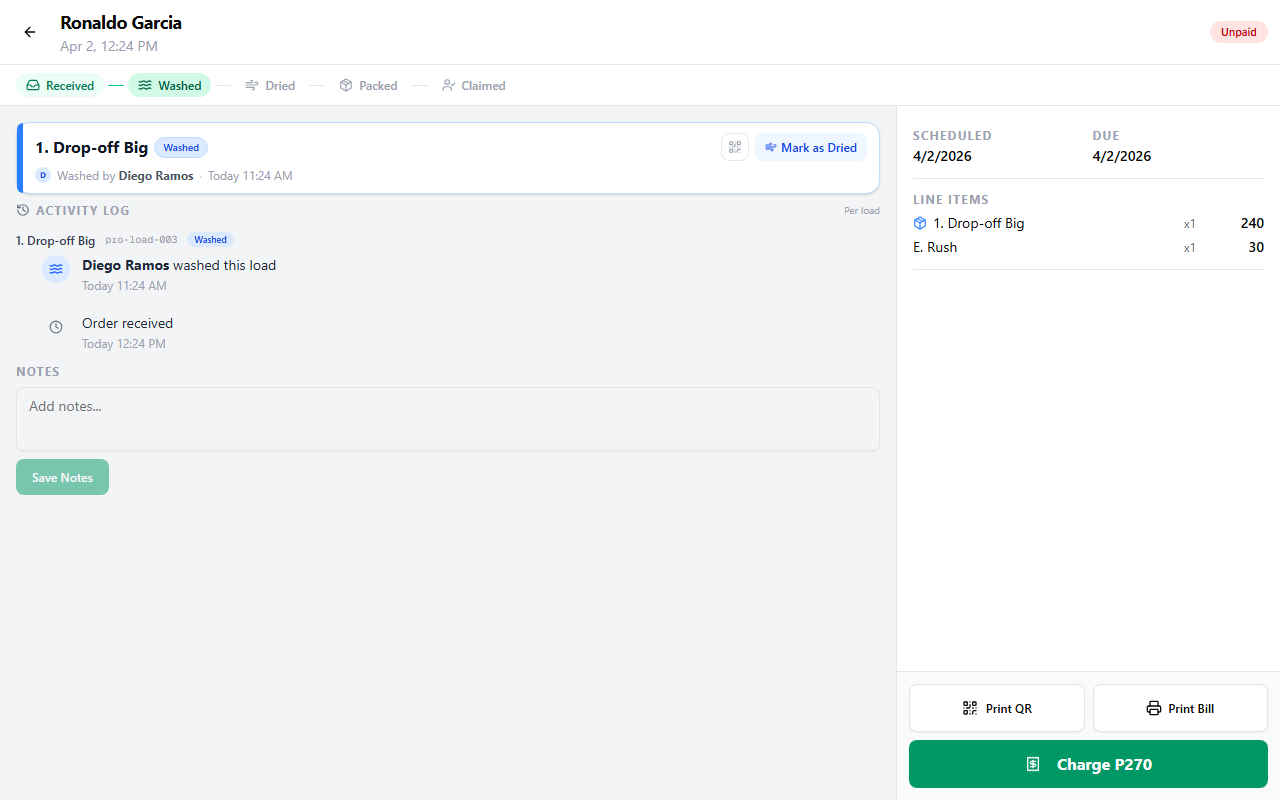
5. The activity log
Below the load cards, the Activity Log shows a per-load timeline of who did each step and when. Each load has its own section with the load type, load ID, and status badge.
Events include:
- Order received, when the order was created.
- Washed by [name], who washed and when.
- Dried by [name], who dried and when.
- Packed by [name], who packed and when.

6. Notes
The Notes section is an editable text area for special instructions or internal reminders. Type your note and tap Save Notes. The button stays disabled until you change something.
Use notes for customer requests like "extra rinse" or "separate whites", for delivery instructions, or for anything your team needs to know about the order.
7. Payment and receipts
The payment section in the right panel changes with the order's payment status.
Unpaid orders
Shows a green Charge button with the full amount. Tapping it opens the register in checkout mode. A Print Bill button prints a draft invoice.
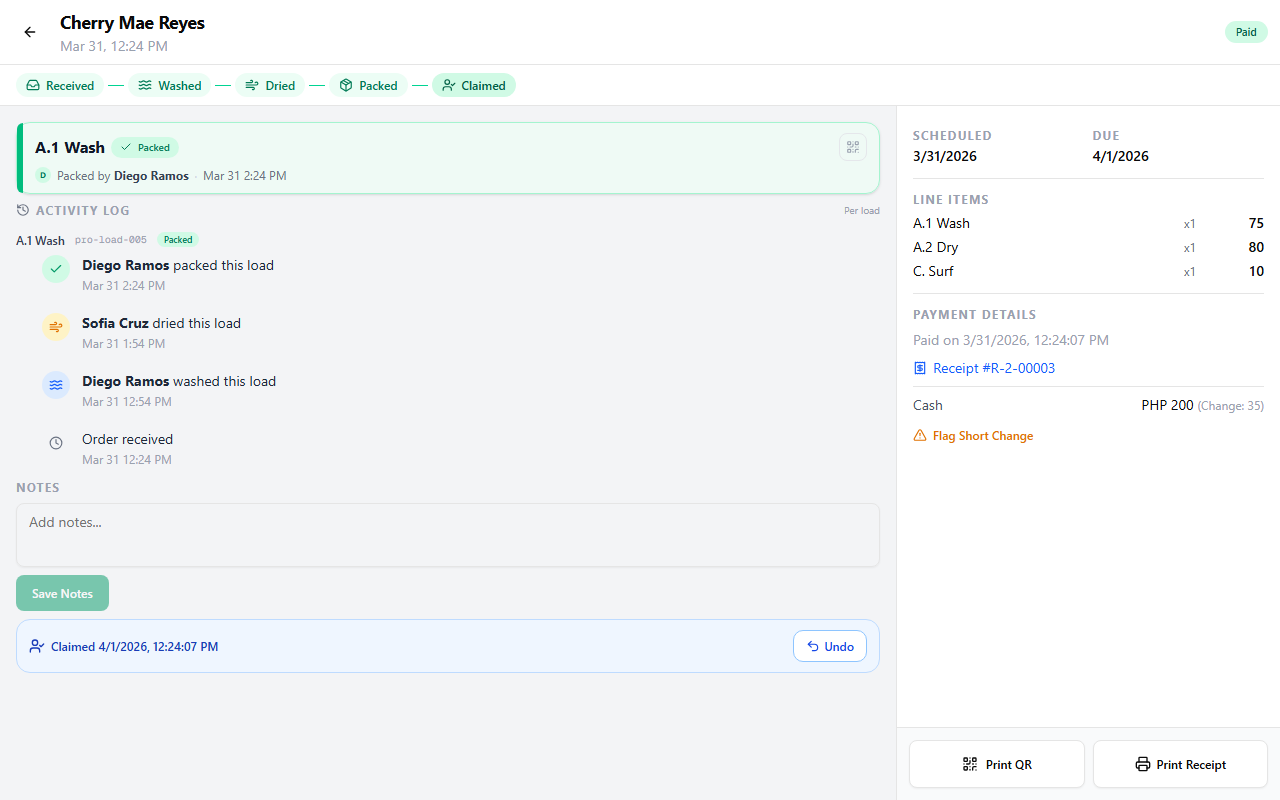
Paid orders
Shows the full payment details:
- Paid date, when the payment was recorded.
- Receipt number, tap it to open the receipt detail dialog.
- Deposit receipts, if partial payments were taken earlier, each deposit receipt is listed and tappable.
- Payment breakdown, the payment type (Cash, GCash, and so on), amount, and change.
- Points earned, loyalty points from this transaction.
Partially paid orders
Shows both the Paid so far amount and the Balance Due. The Charge button shows only the remaining balance.
| Payment state | Available actions |
|---|---|
| Unpaid | Charge, Print Bill, Print QR Labels |
| Partial | Charge remaining, Print Bill, Print QR Labels |
| Paid | Print Receipt, Print QR Labels |
8. Short change
For paid orders where cash change was owed, a Flag Short Change link appears in the right panel. This covers the case where the cashier did not have enough change at the time of payment.
- Tap Flag Short Change. A form opens with the change amount pre-filled.
- Tap Flag. An amber banner shows the amount owed.
- When the customer returns, tap Change Given. This resolves the short change and opens the cash drawer.
For the full short change workflow, including how to void a wrong amount, see Short Change.
9. Claiming an order
When an order is fully paid and all loads are packed, a blue Mark as Claimed button appears. Tapping it records the pickup with a timestamp.
Once claimed:
- A blue banner shows "Claimed [date and time]" with an Undo button.
- The load action buttons are disabled.
- The order card on the board updates to Claimed.
When every load is packed and the order is paid, an amber All loads packed bar appears at the bottom of the loads list. A second line on that bar tells you whether the customer is getting an SMS, with states like "will send at HH:MM", "sent", "no phone", "no credits", "SMS off", or "failed". For the state-by-state reference and how to clear a red banner, see SMS Notifications.
Claiming only shows up when the order is fully paid and every load is packed. If a load is still in progress, or the order has a balance, the claim button stays hidden.
10. Printing
Three print actions sit in the actions area at the bottom of the right panel.
| Action | When available | What it prints |
|---|---|---|
| Print QR Labels | Any order with loads | QR labels for each load, to stick on the bags |
| Print Bill | Unpaid or partially paid | A draft invoice with line items and total |
| Print Receipt | Paid orders | The full receipt with payment details |
All printing needs a connected thermal printer. See Printer Setup.
11. Mobile view
On phones the two-column layout becomes a single column.
- Load cards, the activity log, and notes fill the screen.
- A sticky bottom bar holds the dates, line items, total, payment info, and the action buttons (Charge, Print Bill, Print Receipt, Mark as Claimed).
Everything works the same as the desktop layout.
Common issues
"The Mark as Claimed button isn't showing"
Claiming needs the order fully paid and every load packed. Check the payment badge in the header and confirm no load is still in progress. If there is a balance, charge it first. If a load is still on wash, dry, or pack, finish it.
"I don't see the override dropdown on a load card"
The jump-to-any-stage dropdown is the Override load status permission, held by Owner, Admin, and Manager but not Cashier. As a cashier you advance loads one step at a time with the action button instead. Ask an Owner or Admin if you need a load corrected.
"The customer didn't get the ready-for-pickup SMS"
Check the second line on the All loads packed bar. It names the reason, such as no phone number on the customer, no SMS credits, or notifications turned off. See SMS Notifications for how to clear each state.
"A print button is greyed out or nothing prints"
Printing needs a paired thermal printer, shown by the printer icon in the header. If it is not connected, see Printer Setup. Print Bill only shows on unpaid or partially paid orders, and Print Receipt only on paid ones.
What's next?
- Order Board: track every active order at a glance.
- Processing Payments: payment types, discounts, and receipts.
- Short Change: handle under-payments and owed change.
- Open Tickets: find and charge orders you saved earlier.
Stuck? Email [email protected]. The founder reads every message.