Setting Up Stations
Stations is the phone-sized app your back-of-house staff use to clock in, scan QR labels on laundry bags, and move loads through wash, dry, pack, and claim. Each tablet or phone in the back area runs the Stations app and signs in with the employee's 4-digit PIN. About 4 minutes.
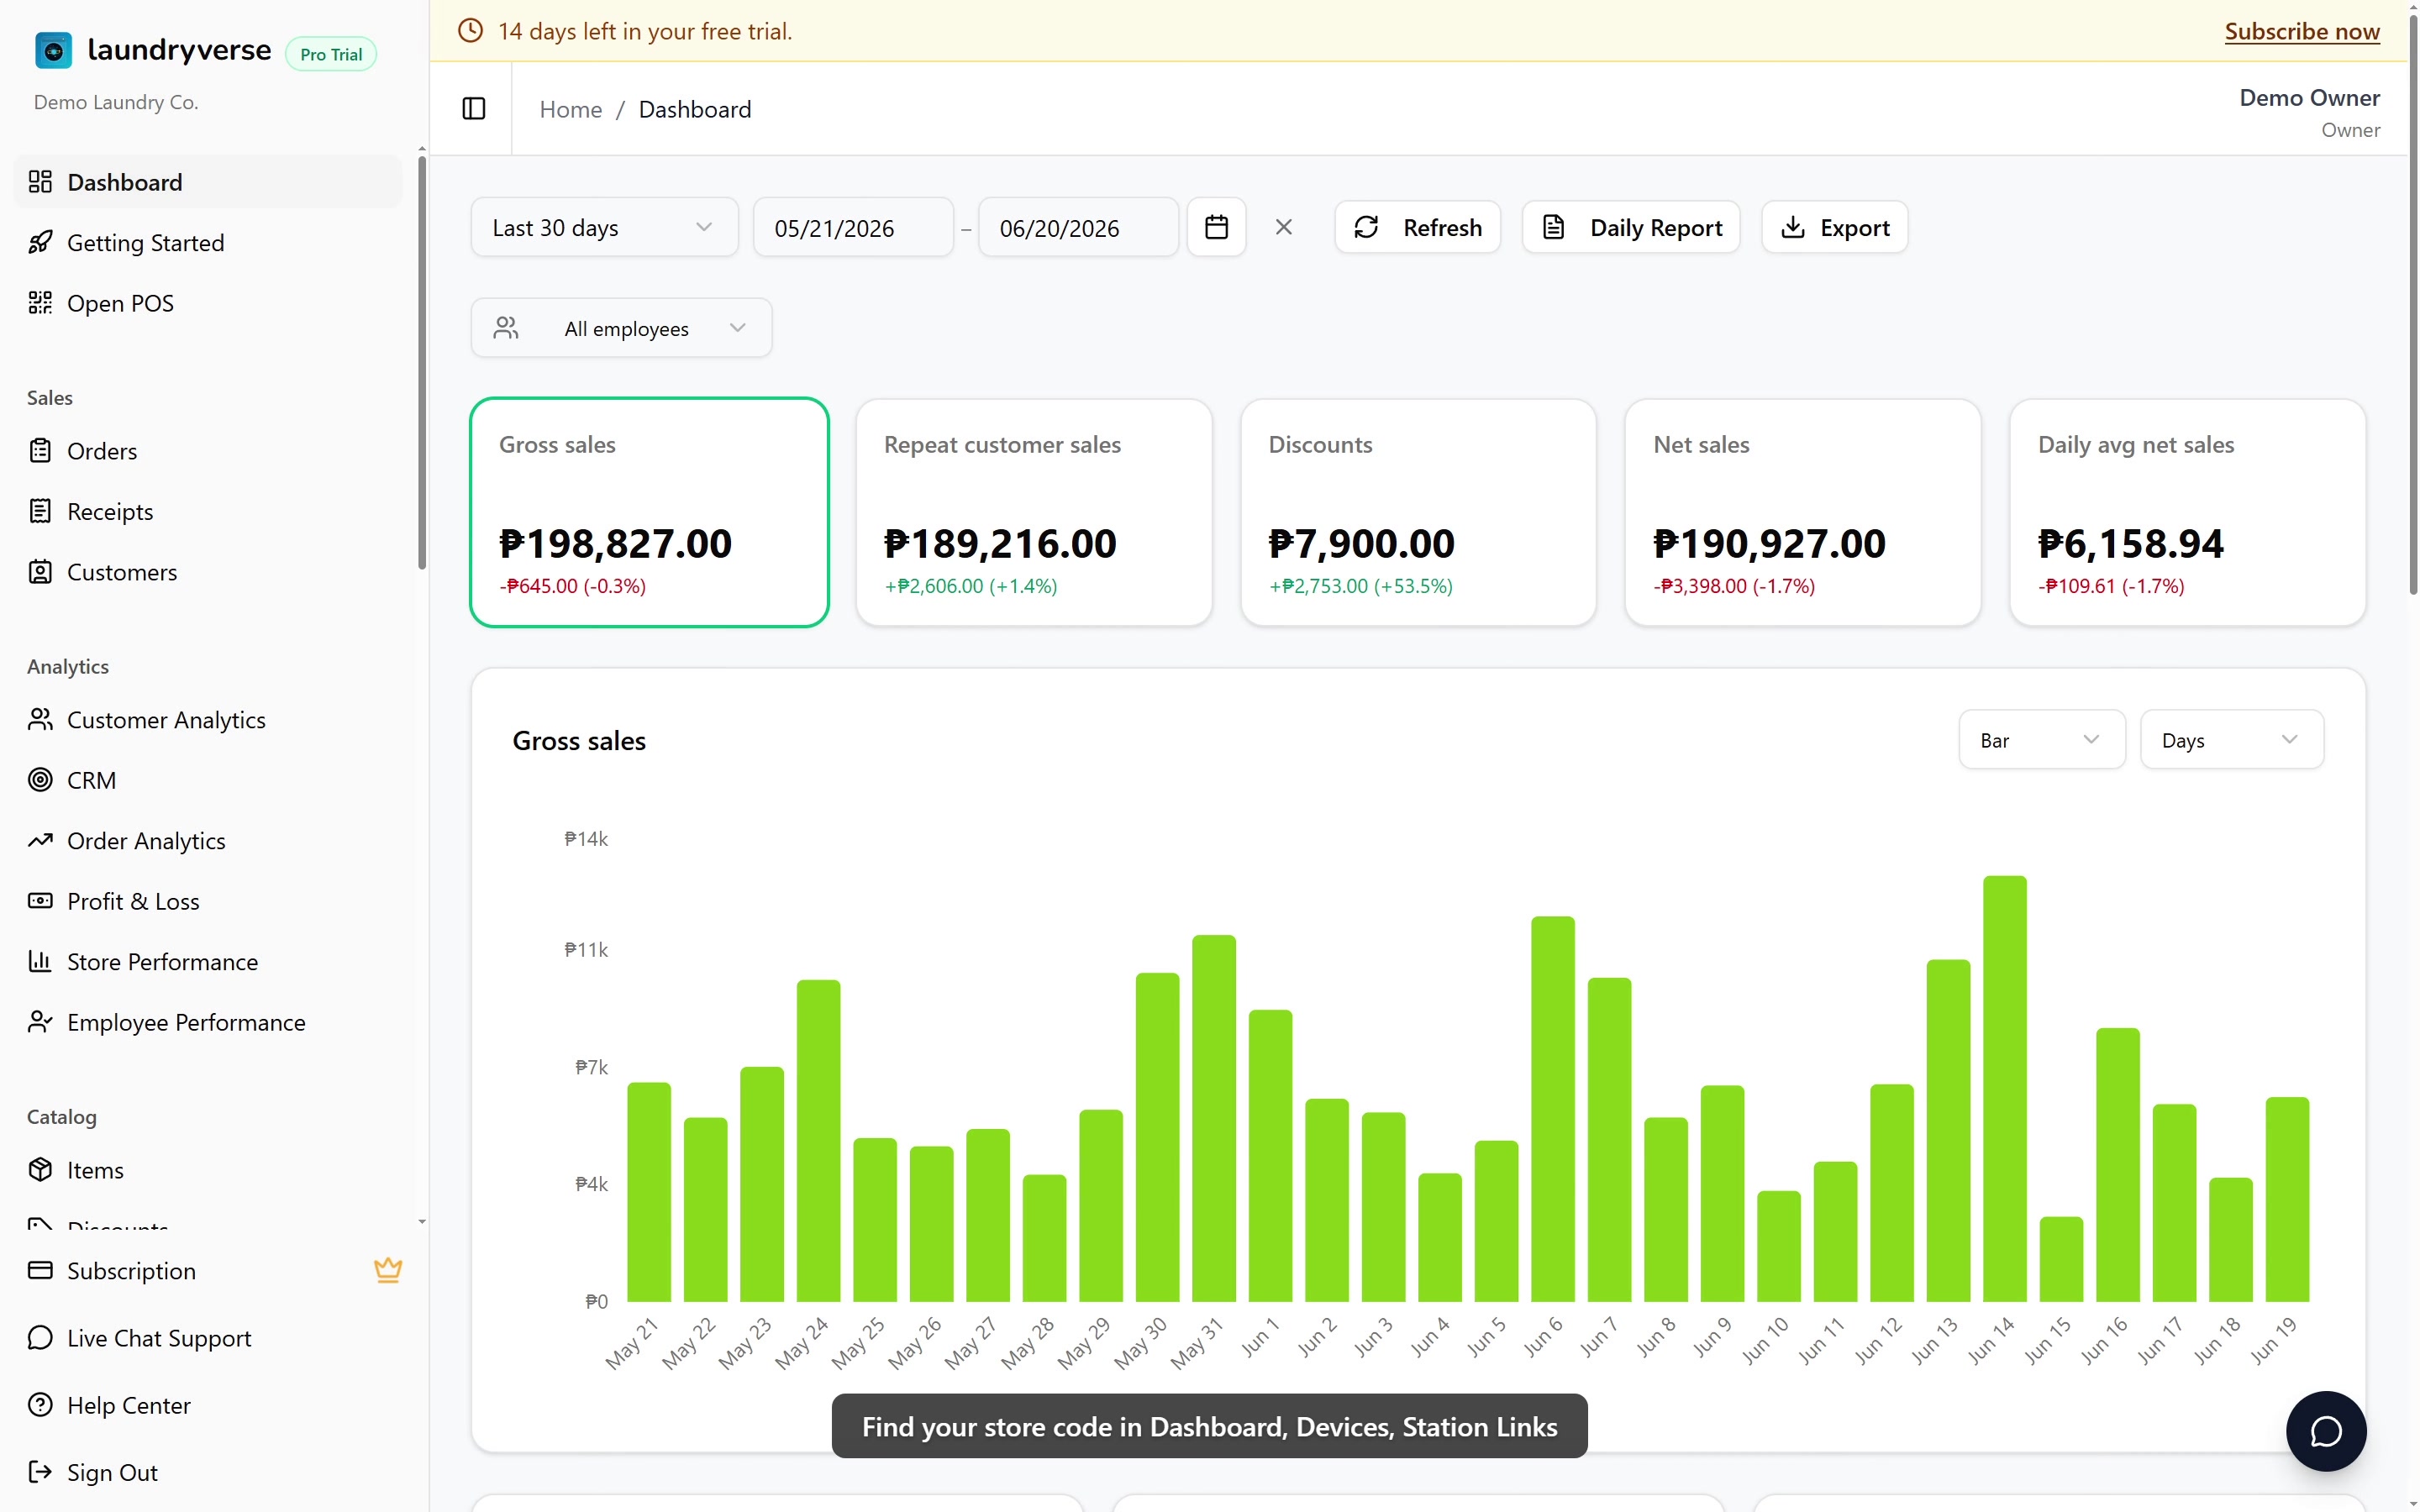
A POS device sits at the front counter for taking orders, accepting payment, and printing receipts. A Station device sits in the back for the wash, dry, pack, and claim steps. They sign in with the same store code and the same employee PIN, but they register as separate device types in Dashboard, Devices, and they show two completely different UIs.
Want the end-to-end version? Watch the 10-minute real-shop walkthrough, covers POS setup, your first order, Stations, and closing the shift, recorded in an actual laundry shop.
Before you start
You'll need:
- At least one store configured. The Stations app binds to a store via that store's 6-character code. See Stores.
- At least one employee with a PIN. Stations sign-in is PIN-only, so anyone using the app needs to exist in Employees with a 4-digit PIN.
- A phone or tablet for each back-of-house station. Any Android phone or tablet works; an old spare phone is fine. iPad and desktop browsers also work as a fallback (see section 6).
Stations have no separate permission gate. Any employee with a valid PIN can sign in and clock in, since most laundry shops want the cashier and the wash/pack staff using the same tablet on quiet days. Who can advance which station is enforced inside the app, not at the device level.
Stations are bundled in every paid tier, including the Starter plan. While your tenant is on an active trial or paid subscription the app works normally. If the subscription fully expires past the grace period the Stations app locks out with a "Subscription expired" screen until billing is restored. See Subscription.
1. Install the Stations app from the Play Store
The Stations Android app is the recommended way to run a station device. It opens in full screen, the QR scanner is faster than the in-browser one, and store-code QRs scanned with the phone camera open the app directly.
Install LaundryVerse Stations on Google Play
From your dashboard you can also reach the Play Store from two built-in spots:
- The blue banner at the top of every dashboard page, "The official POS and Stations Android apps are now available on the Play Store", with a Get Stations link on the right.
- The Getting Started checklist under Dashboard, Getting Started, the Using an Android tablet or phone? card has a Stations Google Play badge.
On the back-of-house device:
- Open the Play Store and search for LaundryVerse Stations, or open the link above on the device's browser.
- Tap Install and wait for the download to finish.
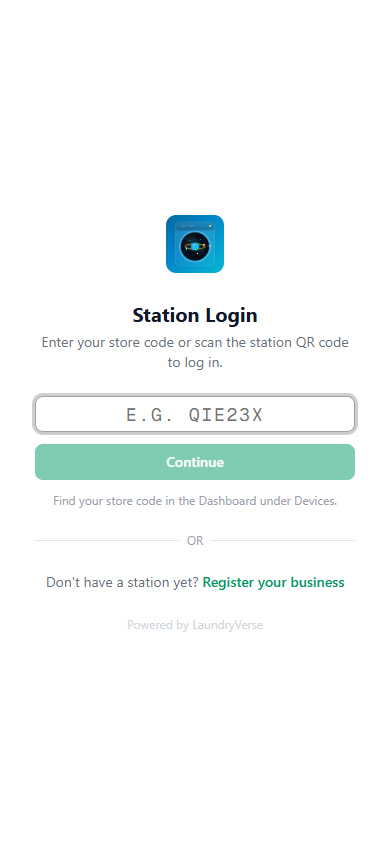
- Open the app. It lands directly on the store code entry screen.
2. Sign in to the store
The Stations app needs to know which of your stores this device belongs to. You connect a device to a store once; after that, the app remembers the store and goes straight to PIN entry on every launch.
There are two ways to connect:
Option A: Scan the store-code QR
This is the fastest path. From the admin dashboard:
- Go to Operations, Devices.
- In the Station Devices card header, tap Station Links.
- Each store has a QR code. Point the device's camera at the QR for the store this device will live in.
On Android with the Stations app installed, scanning the QR opens the app directly and skips the code entry screen. On any other device it opens the Stations sign-in page in the browser with the store already selected.
Option B: Enter the 6-character store code
If the device's camera is awkward to use, you can type the code instead:
- From the admin dashboard, open Operations, Devices, Station Links.
- Read the 6-character store code for the right store, for example
PRO1AB. - On the device, type the code into the Stations sign-in screen.
- Tap Continue. The device connects to your store and shows the 4-digit PIN keypad.
The store code is shared between the POS and Stations apps. The same PRO1AB works for both, but each app has its own QR (one points at /pos/login, the other at /stations/login), so print the POS QR and the Station QR separately. See Devices for the dashboard view.
3. Sign in with a 4-digit PIN
Once the device is bound to a store, every sign-in is just the employee's 4-digit PIN.
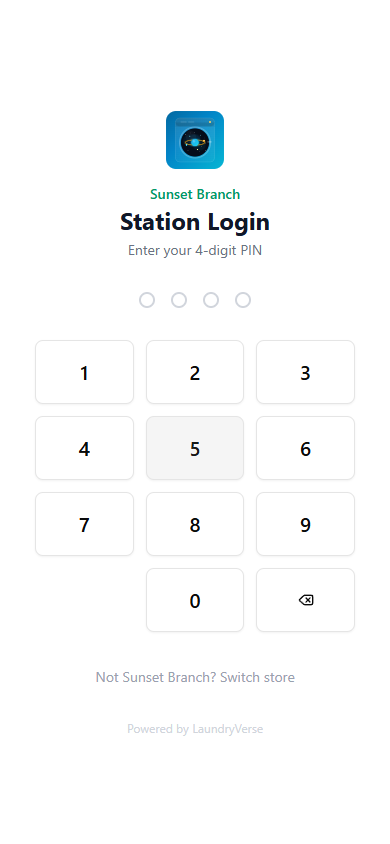
- The employee taps their PIN on the keypad.
- The app submits automatically after the fourth digit, no separate Submit button.
- The device auto-registers the first time someone signs in. A new row appears in the Station Devices card on Dashboard, Devices, marked Active, with the phone or tablet model auto-filled from the browser.
Active station devices count against your subscription's device limit, shared with the POS. Starter caps at 5 active devices, Business at 25, Pro and above unlimited. Trials get unlimited for the full 14 days. To free a slot, toggle a device Inactive from Dashboard, Devices.
If the PIN is wrong, the keypad clears and shows an error. The employee can try again as many times as needed; there's no lockout.
4. Clock in and use the stations
The first thing the employee sees on a fresh sign-in is the clocked-out screen with a single big Clock In button. The four station cards and the QR scanner don't appear until clock-in succeeds, on purpose, so unclocked staff can't accidentally advance loads.
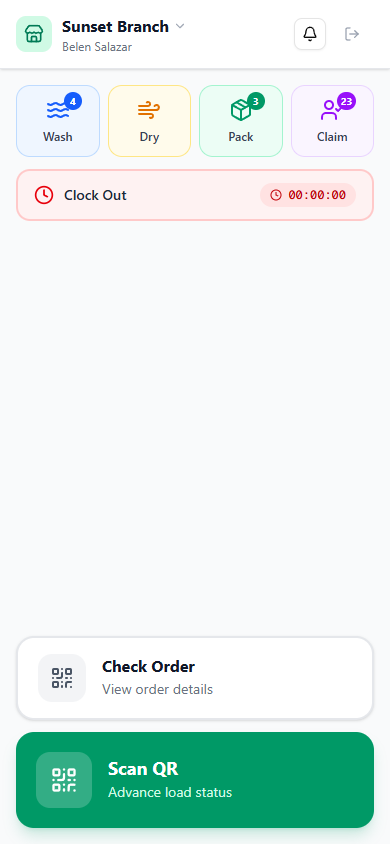
After clocking in, the home screen shows:
| Element | What it does |
|---|---|
| Wash, Dry, Pack, Claim cards | Tappable mini-cards across the top. Each shows a badge with the number of loads currently waiting at that station. Tap one to see the queue. |
| Clock Out bar | Red bar with the elapsed shift time, always visible. Tap to clock out with a confirmation dialog. |
| Check Order | Opens the QR scanner in read-only mode; scan a bag's QR to see the order without advancing the load. |
| Scan QR (green primary button at the bottom) | The main action. Scan a bag's QR to advance its load to the next station. |
Day-to-day, the loop is Scan QR, confirm next status, Scan QR, confirm next status, repeated through the shift. See the QR Scanning to Advance Load and Check an Order guides for the exact flows.
5. Switching stores on a multi-branch device
If a device travels between branches, or you set it up against the wrong store, sign out and re-bind it:
- On the PIN entry screen, tap Not [store name]? Switch store under the keypad.
- The app forgets the saved store and returns to the 6-character code screen.
- Enter the new store's code (or scan the new store's QR) and sign in again.
The device row in Dashboard, Devices stays under the old store until the first successful PIN entry on the new code; at that point a fresh row appears under the new store. If that's a problem (you only ever wanted one row for that physical tablet), delete the old row from Devices after the move; the store code rotates automatically for safety.
6. Browser fallback
If you don't have a spare Android device, or you want to demo Stations on a desktop, the browser path still works:
- Open
laundryverse.app/stationsin any modern browser (Chrome, Edge, Safari, Firefox). - Enter the 6-character store code (or scan the QR with the device's camera).
- Enter the employee's PIN.
The browser version has the same sign-in flow, the same clock-in, and the same station screens. The native app is faster at QR scanning and feels more like a tool than a tab, which is why it's the recommended path on a real shop floor, but the browser version is fully supported as a fallback.
On Chrome you can also install the browser version as a Progressive Web App (Menu, Install app) for a similar full-screen feel without the Play Store. On iPad and iPhone, Safari's Share, Add to Home Screen does the same thing.
Common issues
"I can't find the Stations app on the Play Store"
Search for the exact name LaundryVerse Stations (with a space), or open the direct link on the device. If the Play Store says Your device isn't compatible, the device is on a very old Android version; use the browser fallback at laundryverse.app/stations instead.
"Invalid store code" when entering the code
The store code on the dashboard was rotated since the device was last paired, or you mistyped it (codes are 6 characters, uppercase letters and digits, no spaces). Open Dashboard, Operations, Devices, Station Links, read the current code for the target store, and re-enter it. Codes are case-insensitive in the input field but always display in uppercase.
"Cashier scanned the QR but landed in the browser instead of the app"
The Stations app handles laundryverse.app/stations URLs as a verified deep link, but only after the app is installed and opened at least once. Install from the Play Store, open the app once so Android registers the deep-link handler, then re-scan the QR.
"PIN screen says the PIN is wrong, but I'm sure it's right"
Check Dashboard, Employees that the employee exists, is Active, and has a 4-digit PIN set. PINs are per-tenant, not per-store, so the same PIN works at every branch. If two employees share a PIN, the dashboard refuses to save the second one, so this can't be an ambiguity bug.
"Clock In keeps asking for location permission, or it's denied"
The clock-in flow records the device's coordinates for time-card audit. On Android, open the phone's Settings, Apps, LaundryVerse Stations, Permissions, Location and set it to Allow only while using the app. On the browser fallback, open the browser's site settings for laundryverse.app and allow location, then reload. If the device truly has no GPS, see Clock In for the no-location fallback.
"The Stations app shows a Subscription expired lockout screen"
The tenant's subscription is past its grace period. Open Dashboard, Subscription on a dashboard browser session to restore billing, then the app unlocks on the next launch. See Subscription for the full phase-by-phase behavior.
What's next?
Your station device is bound and your team is ready to scan. Continue with the in-app guides:
- Clock In, the exact clock-in flow and what counts toward your shift.
- QR Scanning to Advance Load, scan a bag's QR to move it Wash, Dry, Pack, Claim.
- QR Scanning to View Order, look up an order without changing anything.
Stuck? Email [email protected]. The founder reads every message.